
Sitecore Solr Integration What are we trying to achieve? : Sitecore Solr Integration What versions are being used for integration? : Sitecore 8.2, Solr 5.1 Is there any compatibility matrix for Sitecore Solr Integration? : Yes, Sitecore Solr Compatibility matrix is here. How do we achieve this? : Please follow the documentation below. Sitecore Solr Integration Steps: 1- Solr Installation 2- Solr Configuration, Creating cores and building the Indices 3- Misc. Configurations A- Solr Installation : – Solr versions before 5.0 were not stand alone servers, so to install them as a service we needed software like Jetty as service helper to manage the Solr as service – With 5.0 version and ahead now Solr itself runs as a standalone service. – So if you decide how you want to manage Solr – o as a service – you will need another software NSSM to act as service helper o standalone – you can execute Solrservice.exe from the installation folder – In this documentation we will try to use Solr as a service. – Below will be the list of requirements o NSSM – Solr service helper
- Download NSSM and copy to d:solrnssm.
- We only need nssm.exe for our purpose.
- We will create a few PowerShell/Batch files for NSSM to install, start, stop, restart or uninstall Solr.
- To install Solr
- Install.ps1
- To start Solr
- Start.ps1
- To stop Solr
- Stop.bat
- To restart Solr
- Retart.ps1
- To Un-Install Solr
- UnInstall.bat
- Please see the snapshot below the files under folder d:solrnssm :
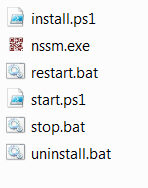
- What is in Install.ps1 –
cd “D:solrnssm” nssm install “Solr5.1.0” “D:solrSolr5.1solr_start.bat” Note: NSSM is installing Solr as service name “Solr5.1.0” by executing the batch file solr_start.bat.
- What is in solr_start.bat –
cd “D:solrsolr-5.1.0server” java -Xms64M -Xmx256M -Djetty.port=8999 -Djava.util.logging.config.file=etc/logging.properties -jar D:solrsolr-5.1.0serverstart.jar Note: start.jar is executed using specified port and memory arguments.
- What is in Restart.bat –
net stop Solr5.1.0 net start Solr5.1.0 Note: First stop the Solr by name “Solr5.1.0”, then start it.
- What is in Start.ps1 –
net start Solr5.1.0 Note: First start the Solr by name “Solr5.1.0”
- What is in Stop.bat –
net stop Solr5.1.0 Note: First stop the Solr by name “Solr5.1.0”
- What is in UnInstall.bat –
nssm remove Solr5.1.0 confirm Note: Removes “Solr5.1.0” service B- Solr Configuration : – Use Install.ps1 and Start.ps1 scripts to install and start the Solr service. – You can see the following screen when Solr runs successfully. 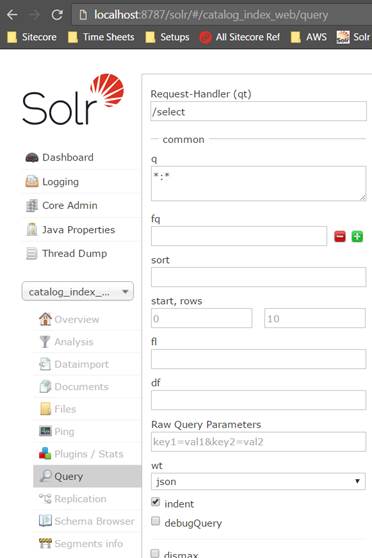 – Now let’s configure Solr config files o Go to folder – “serversolrconfigsetsbasic_configsconf “ to config the file below:
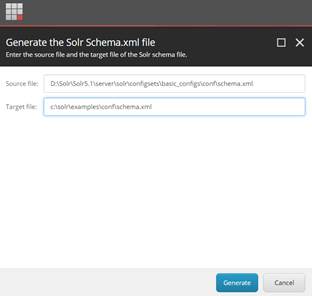
- Schema.xml
- You can generate the Schema file using the Sitecore.
- See screenshot below:
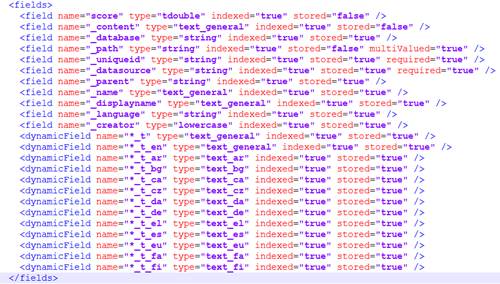
- Also configure the<field> and <dynamicfield> tags under <fields> tag , <fieldType> elements in a <types> tag and any <types>: <fieldType name=”pint” to class=”solr.TrieIntField“/>
- Finally save the file
o Go to folder – “serversolr “ to config the files below:
- Solr.xml
- This file is used for configuring the main Solor config settings
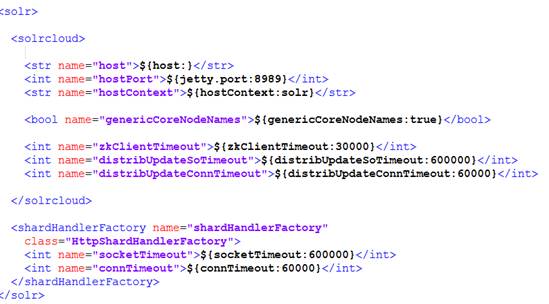
- SolrCores.xml
- This file is used for configuring the cores
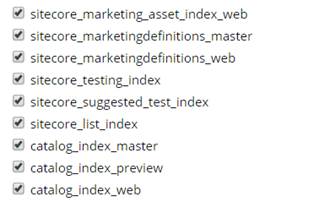
- The following coresneeds to be configured:
o sitecore_web_index o sitecore_master_index o sitecore_core_index o sitecore_analytics_index o social_messages_web o social_messages_master o sitecore_marketing_asset_index_master o sitecore_marketing_asset_index_web o sitecore_testing_index o sitecore_suggested_test_index o sitecore_fxm_master_index o sitecore_fxm_web_index o sitecore_list_index
- See snapshot below:
 o To add new core :
- Use the add button on Solor Admin panel:
- Or Alternative use the CREATE method exposed by the service:
- The call will be something like this:
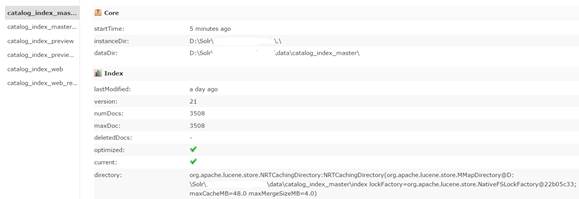
$port=8787 $instanceRoot=”D:SolrSolr5.1” $name=”Sitecore_master_rebuild_index” http://localhost:$port/solr/admin/cores?action=CREATE&name=$name&instanceDir=$instanceRootserversolrconfigsetsbasic_configs&schema=schema.xml&config=solrconfig.xml&dataDir=$instanceRootserversolrcores$namedata o To Rebuild the indexes :
- Use Sitecore Indexing manager to index .
- Rebuild indexes will look like this:
 C- Misc. Configurations :
- Configure Sitecore to Use Solr instead of Lucene.
- Install Solr Support package
- Install Solr support package from Sitecore
 o Unzip the Sole support package and get all the binaries from it and copy to the Sitecore bin folder, The following binaries will be copied:
- Castle Windsor
- Unity
- Ninject
- Autofac
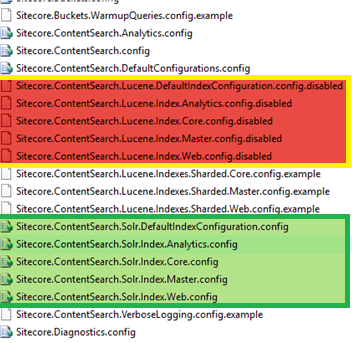
- Enable Solr Configs
- Remove the .example suffix from any configs having ‘Solr’ word in file name from the path websiteApp_ConfigInclude
iii. Disable Lucene Configs
- Add .disabled suffix to any configs having ‘Lucene’ word in file name from the path websiteApp_ConfigInclude
After having done this configuration, you should be good to go.