
Linux Commands – Part 1 of 4
- What is Linux –
- an operating system
- open-source software
- consists of a core, called as Kernel and additional software on the top of that
- Kernel + additional software = a distro
- Fedora, Ubuntu, RHEL, Centos etc are different kinds of distros.
- runs of a lot of hardware platform from super computers to electronic devices.
- is light weight and additional software can be added ad per the focus or need
- Linux Directory structure –
- In Linux, everything is a file.
- Here is a generic top level file hierarchy:
- / – root or top of the file system.
- /bin – Binaries and executables.
- /etc – system configs.
- /home – Home directory.
- /opt – optional or third party.
- /tmp – temporary – gets cleaned up on reboot.
- /usr – user specific programs.
- /var – variable data files e.g. logs.
- The Kernel or the Shell –
- the core or the heart of the Linux OS
- interface between the software application and the hardware
- the bare minimum working architecture
- any distros are built on the top of it – a server distro might not have a dektop w
- the default command interprator
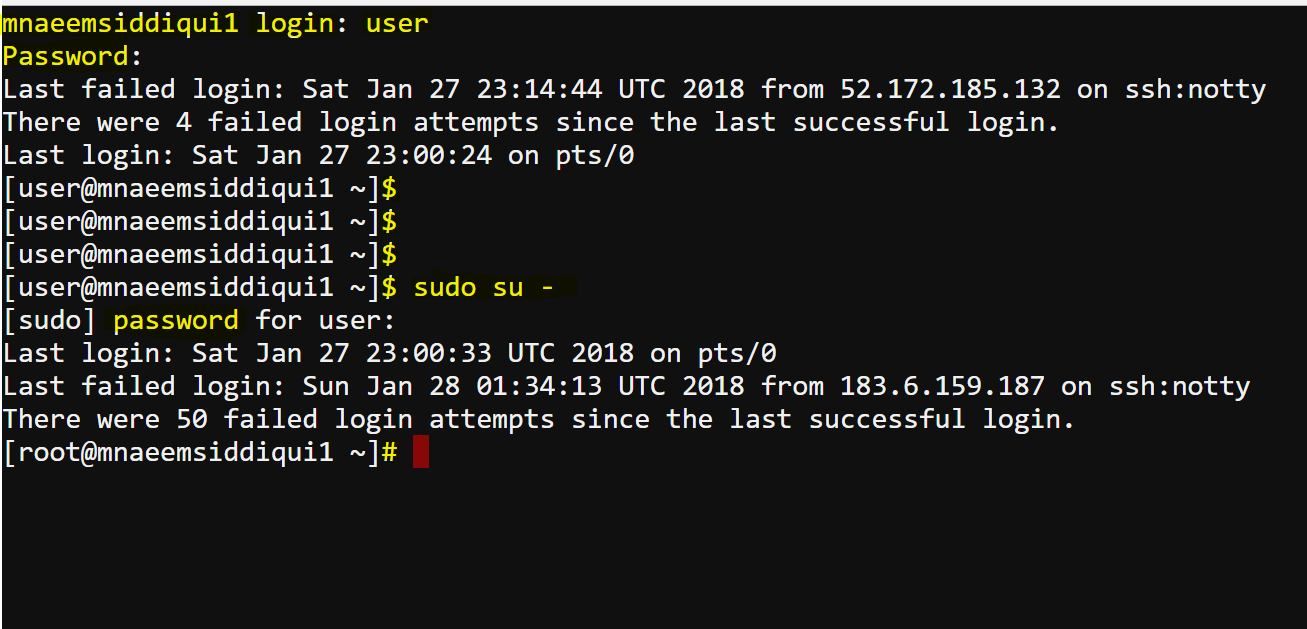
- has a root user and you can create users, groups and assign permissions to users and groups.
- when you login as a normal privilege user then the shell prompt is a ‘$’
- when you login as a super user or elevate your permissions as a super user then the prompt changes to a “#”
- a super user/root user or user with elevated root permission has ultimate power to do anything on the server.
- Root access should be limited to admins only and is used to install software, update patches, start/stop applications etc
- Linux commands –
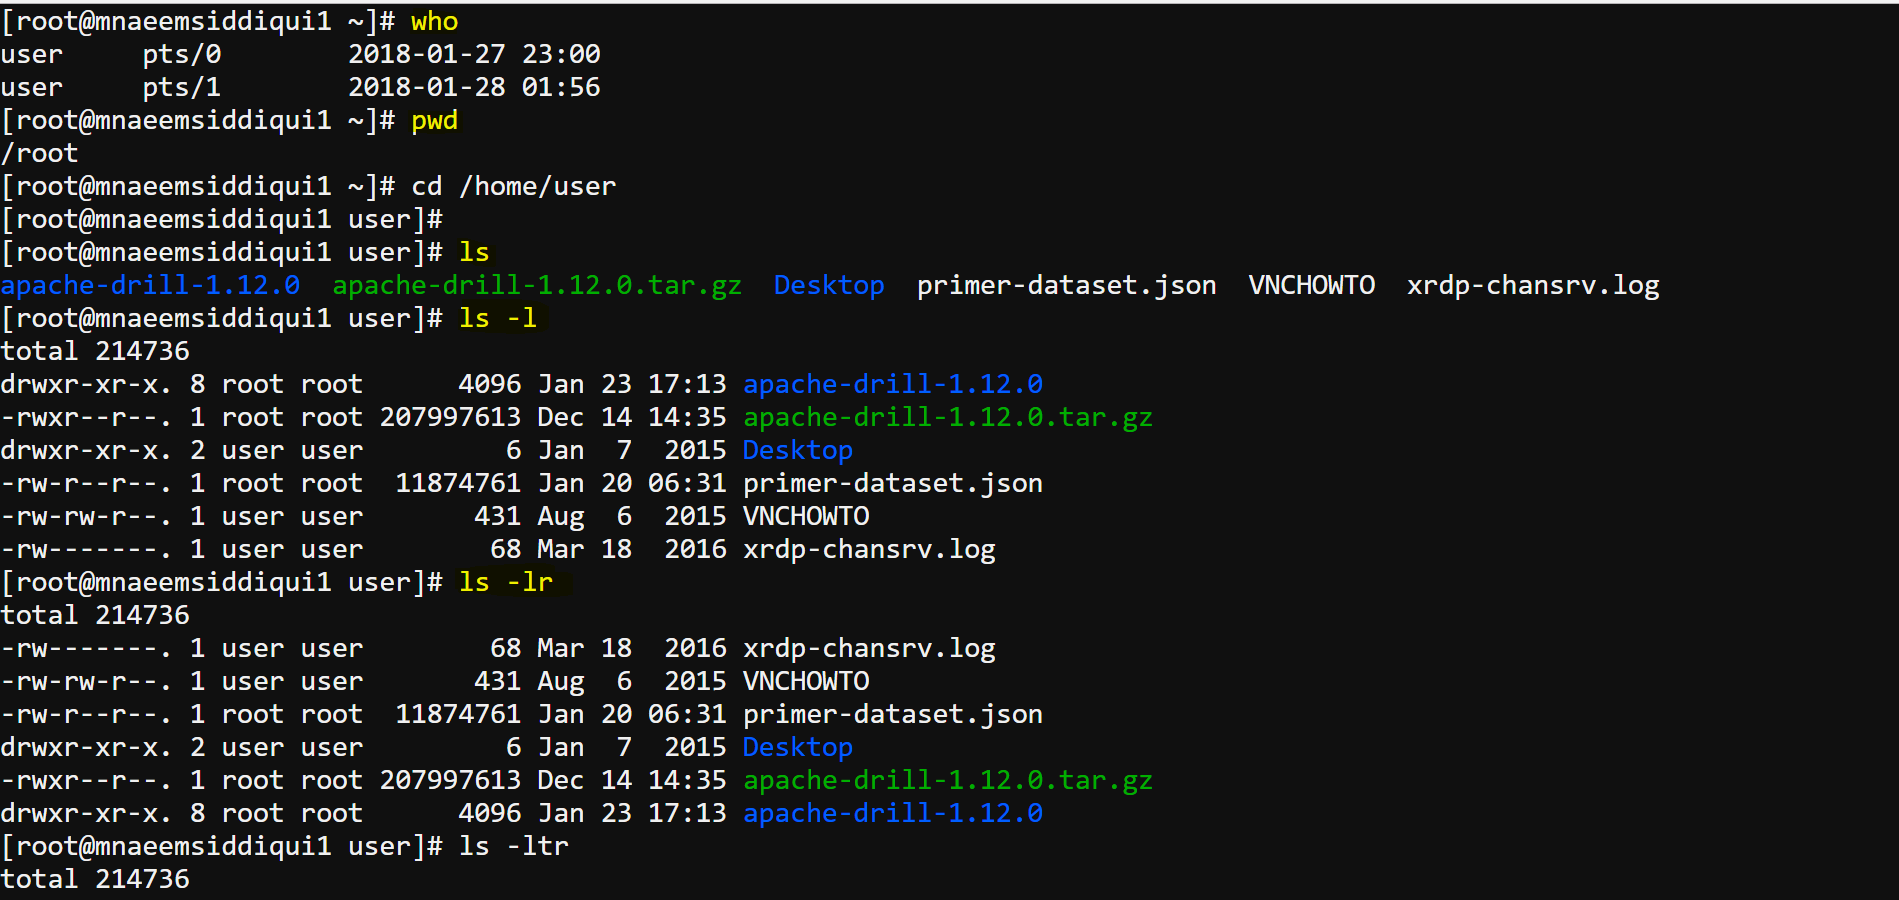
- ls – to list directory and its contents.
- for normal listing use command ls <path> e.g.
- ls – lists current directory and contents
- ls / – lists root directory and contents
- ls /bin – lists bin directory and contents ( it consists of all your basic commands like cd, ls, man, mkdir, rm etc – very big list
- for long listing use command ls -l <path> e.g.
- for reverse order listing use command ls -r <path> e.g.
- for time-stamp listing use command ls -t <path> e.g.
- for showing hidden files also use command ls -l <path> e.g.
-
E.g. for ls, ls -l, ls -lr -
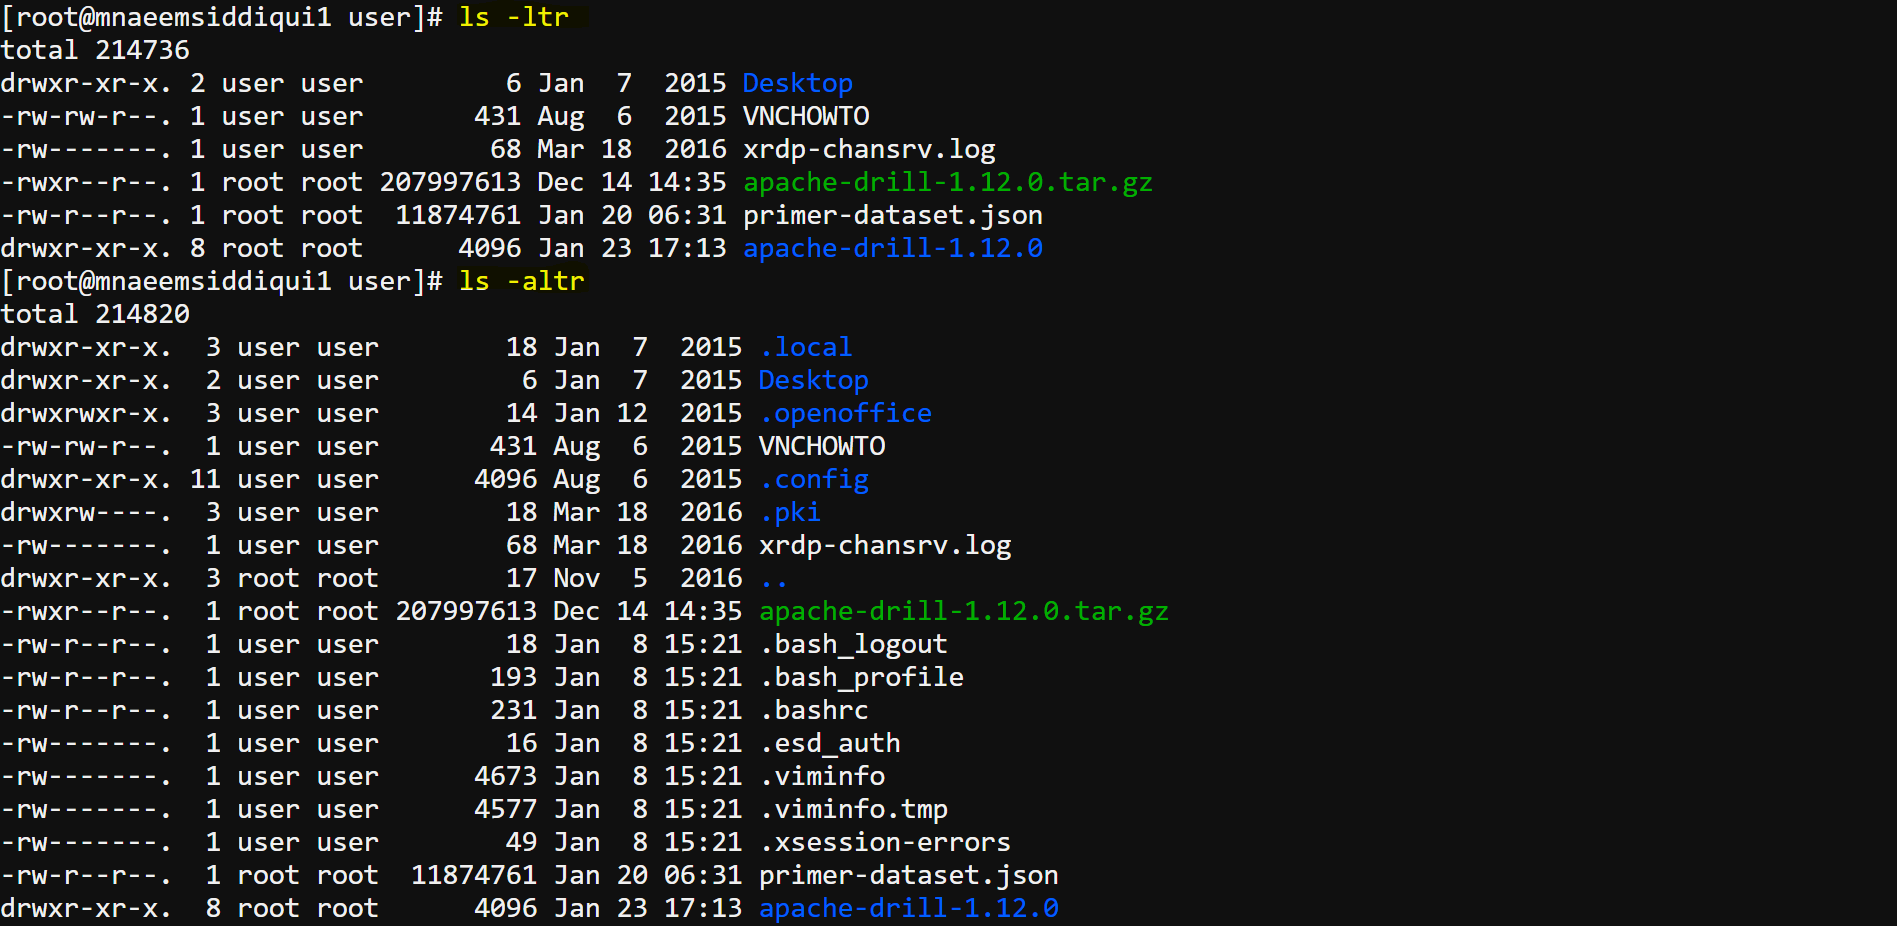
E.g. for ls -ltr, ls -altr - for revealing file types use ls -F where (/ Directory @ Link * Executable)
- for viewing the full directory structure use – ls -R dir1 or tree dir1 ( tree commands shows a linear tree structure)
-
E.g for ls -F, ls -R and tree commands
- for normal listing use command ls <path> e.g.
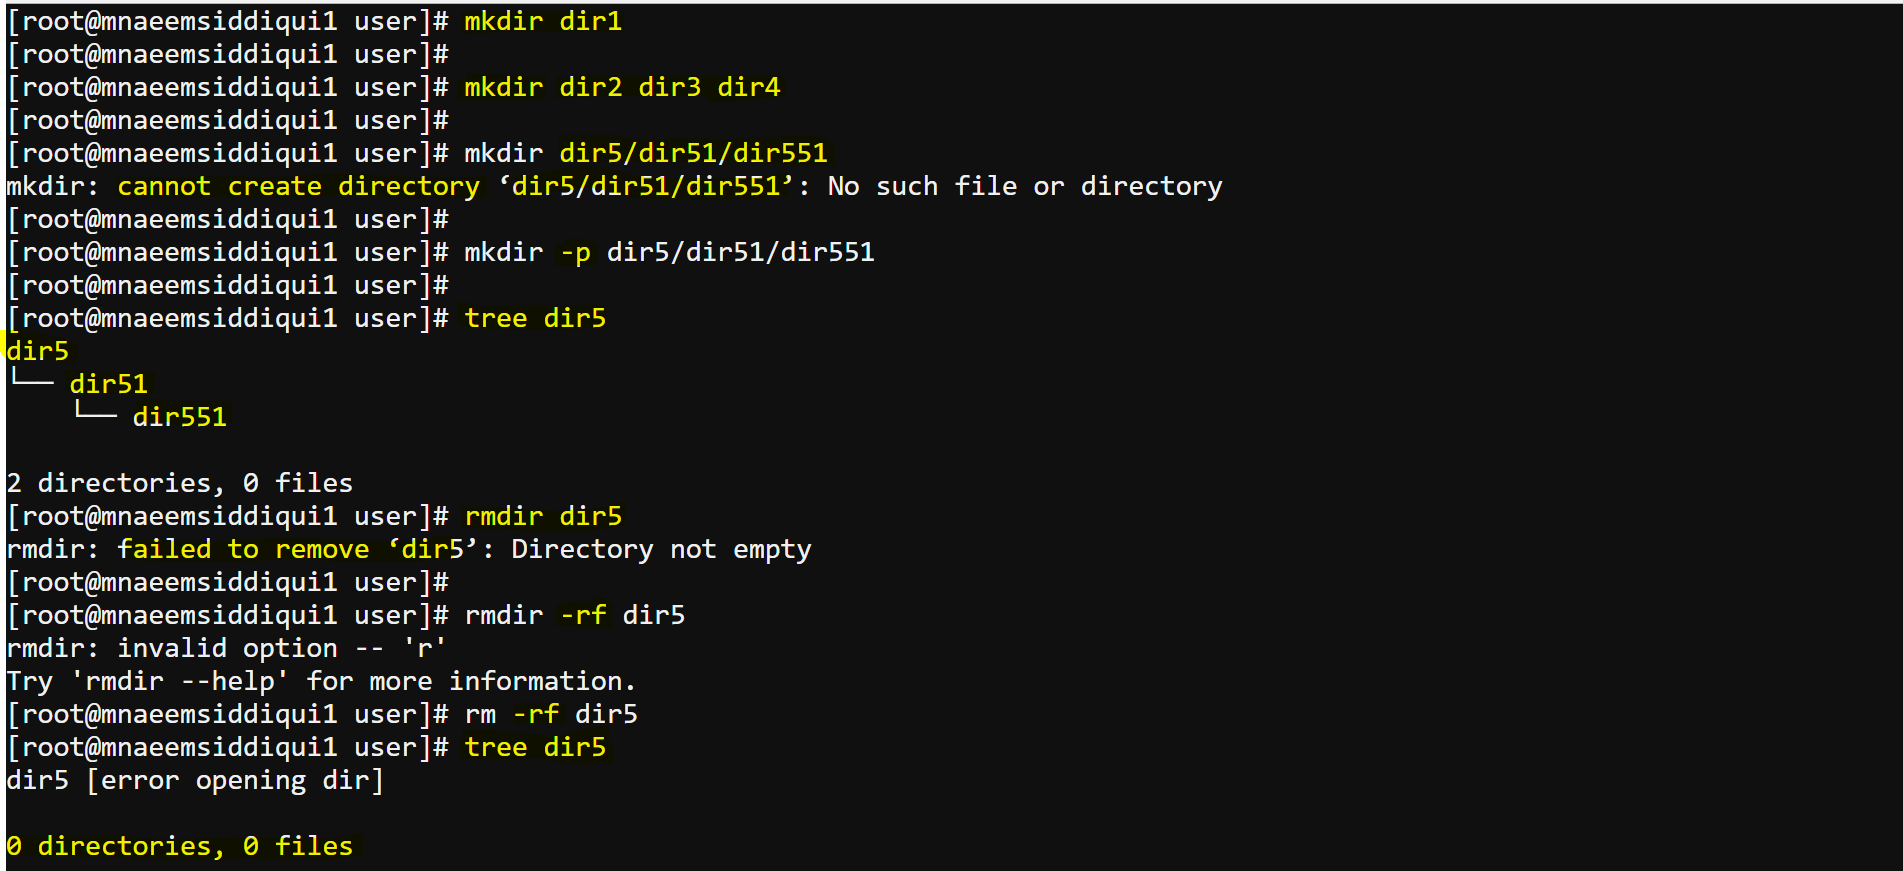
- mkdir, rmdir – to make or remove directories
- mkdir dir1 – makes dir1 directory under current path
- mkdir dir1 dir2 dir3 – makes dir1, dir2 and dir3 directories under current path
- mkdir dir1/dir11/dir12 – error
- mkdir -p dir1/dir11/dir12 – makes dir1 under current path and then dir11 under dir1 and dir12 under dir11
- rmdir dir5 – error
- rm -rf dir5 – removes all directories and all contents inside a folder recursively and forcefully.
- cd – change to a directory.
- cd . : change to current directory
- cd .. : change to parent directory
- cd – : change to previous directory
- cd / : change to root folder
- cd ~: change to home directory of that user ( e.g for root user it will be / , for the user ‘user’ it will /home/user
- cd <path> : change to specified path – cd dir1 or cd dir1/dir11
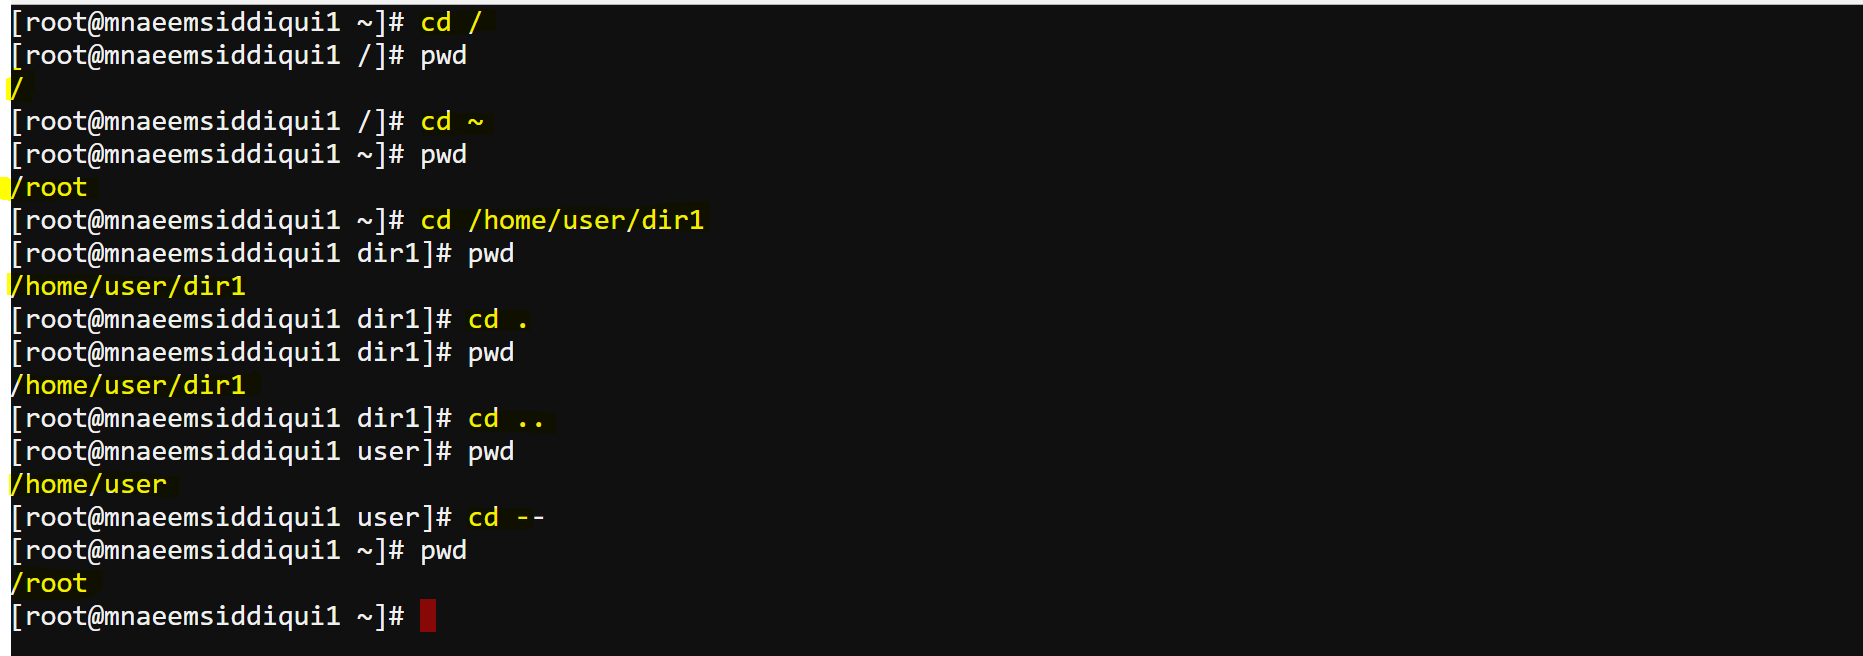
- pwd – to display current/present working directory.
- cat – to concatenate and display files.
- echo – to display to screen.
- exit- to exit current shell or session.
- clear – to clear screen
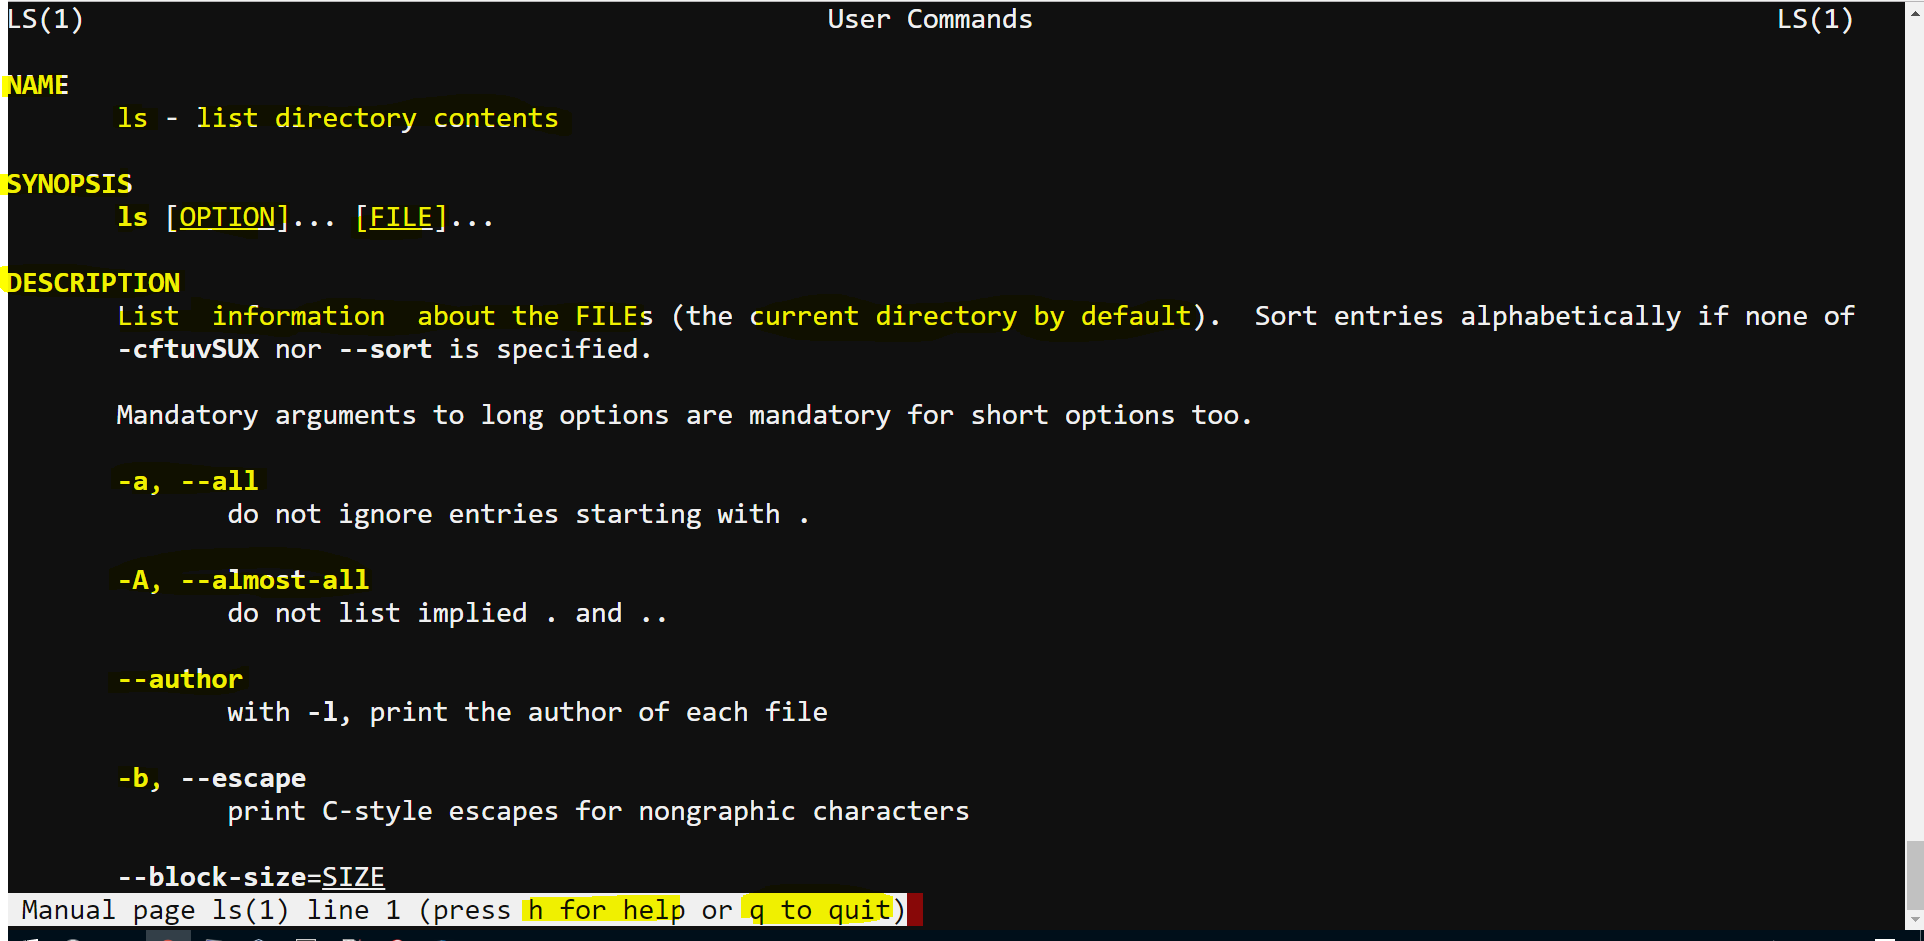
- man – to display manual or documentation.
- for manual/documentation for e.g. ls command – man ls
- Once the documentation is displayed use following keys to maneuver the documentation
- Enter – to move down line by line
- Space bar – to move down page by page
- g – to top of the page
- G – to bottom of the page
- q – quit the manual/documentation
- h – help on man commands
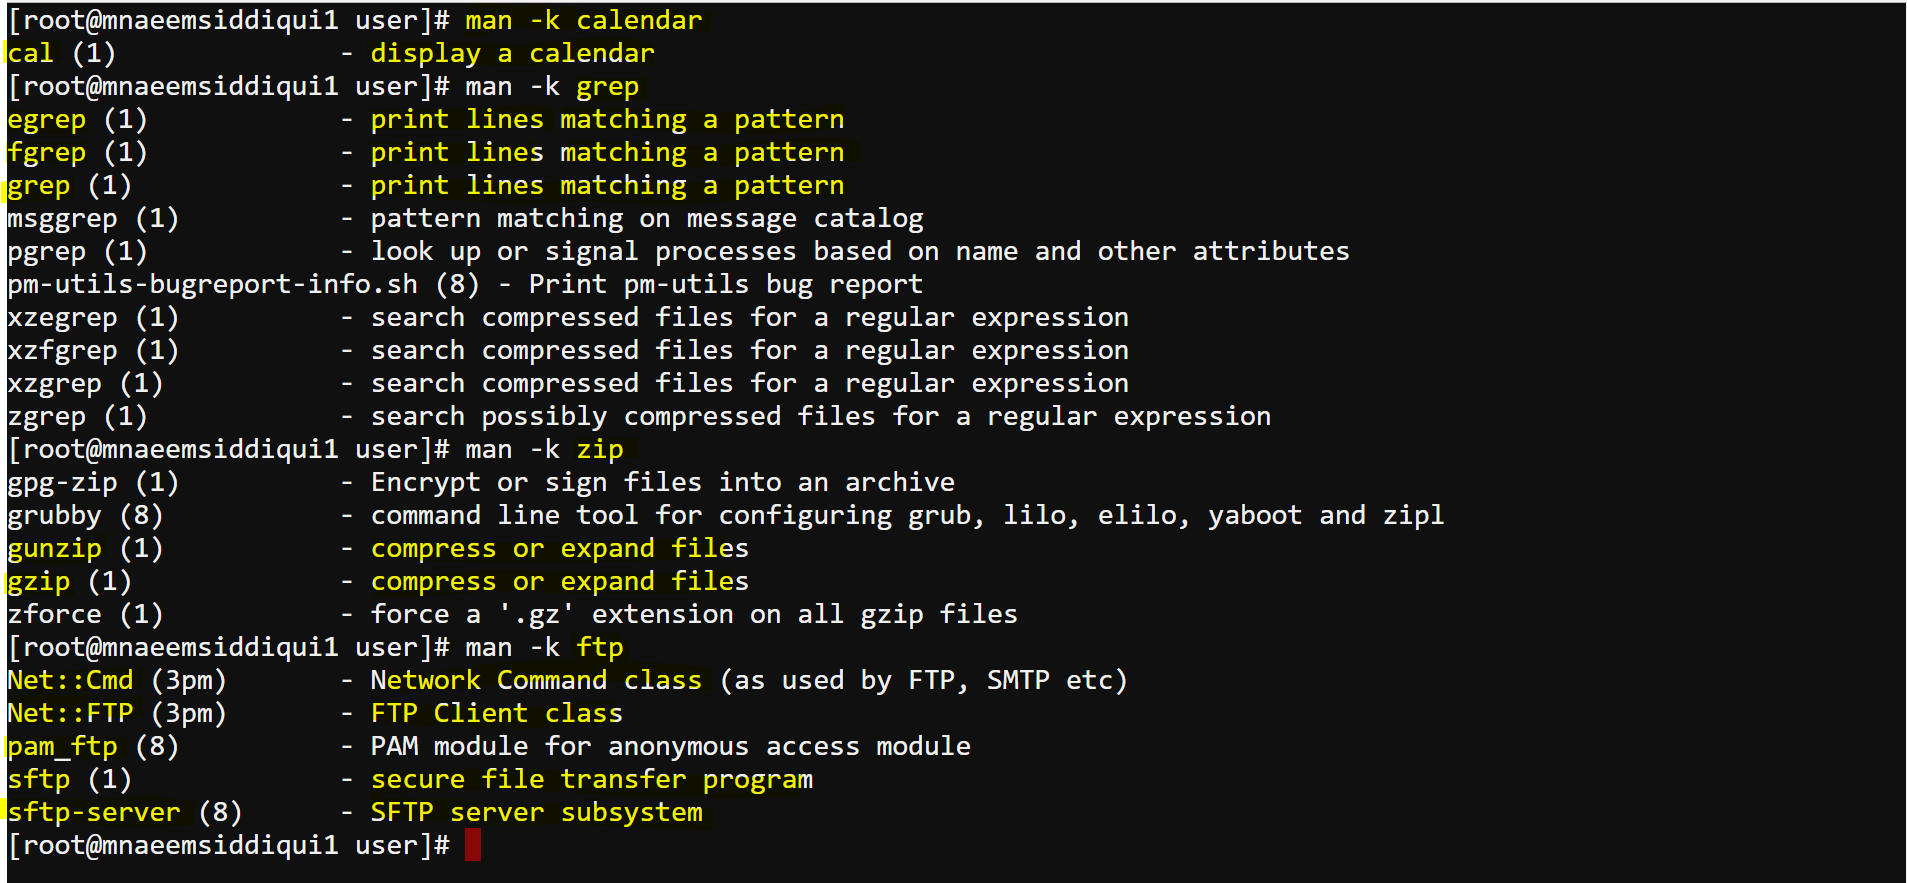
- Searching on man commands – man -k <search-term> e.g man -k calendar or man -k zip or man -k ftp. very helpful to check from the manuals which command does what.
- Environmental variables –
- echo $VAR_NAME
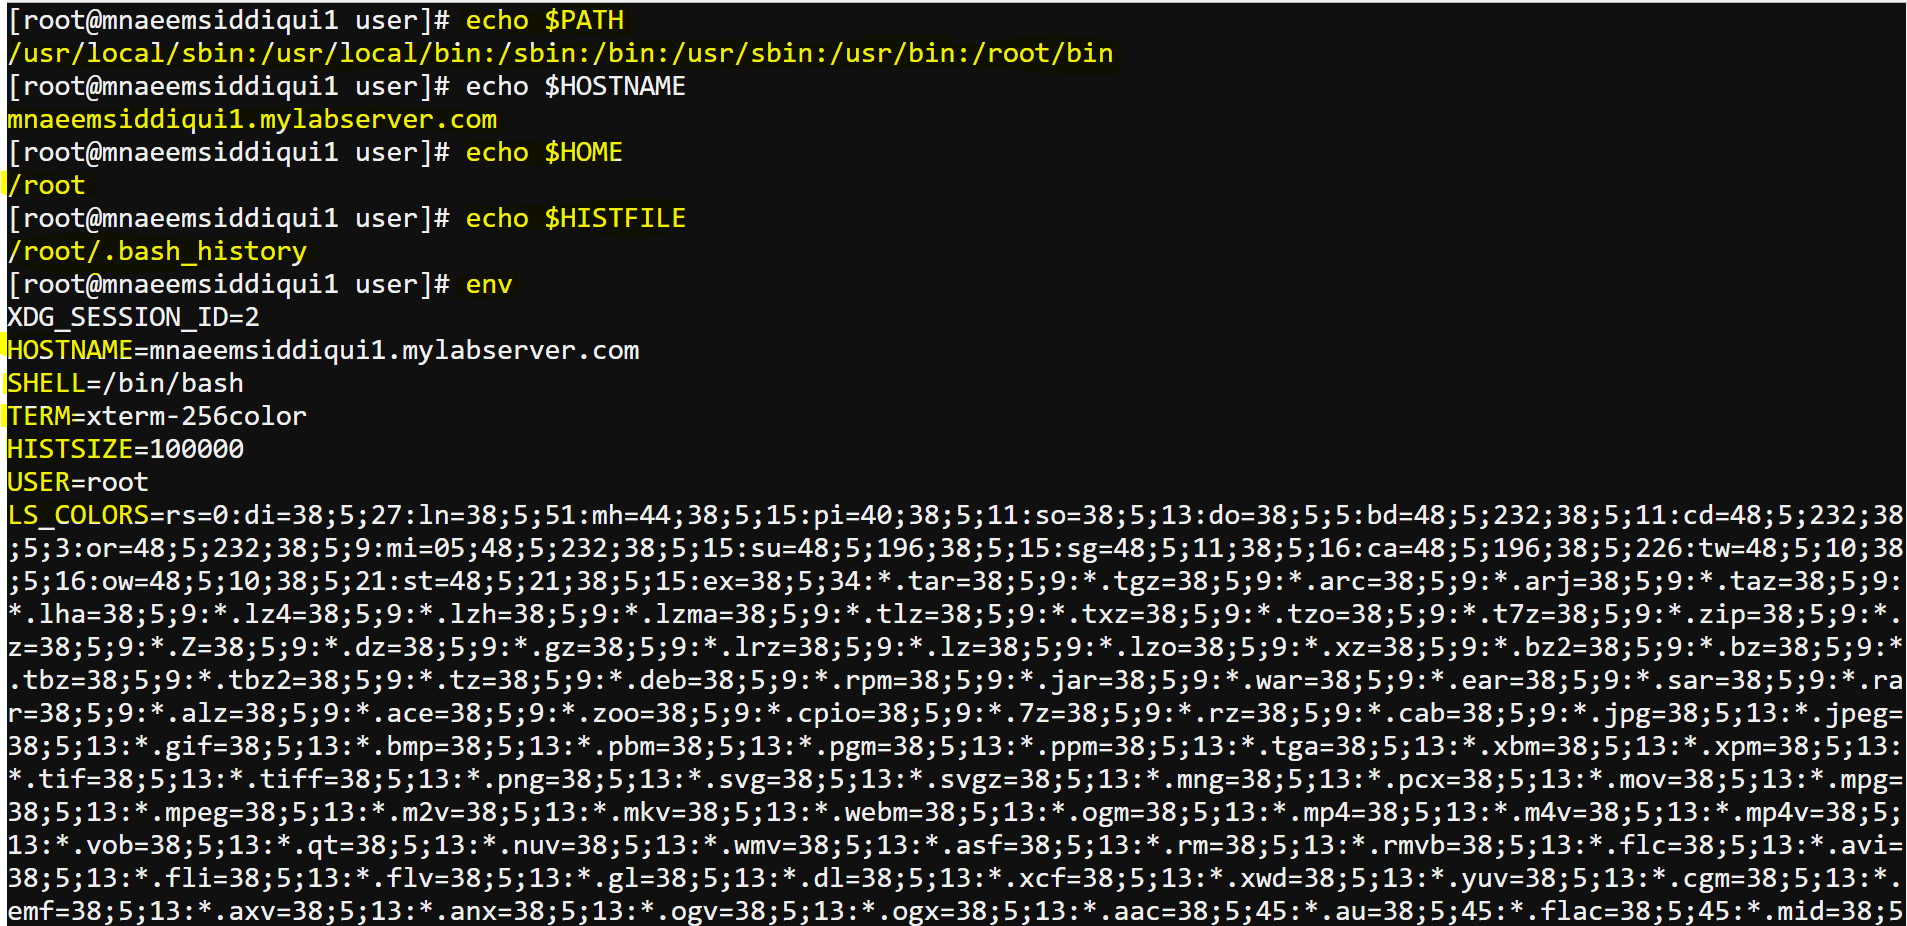
- $PATH – search path for commands – echo $PATH
- $HOSTNAME– name of the computer – echo $HOSTNAME
- $HISTFILE– path to history files – echo $HISTFILE
- $HOME– oath to home directory – echo $HOME
- env – detail info about the current enviromwnt – env or printenv>env.txt and cat env.txt
- ls – to list directory and its contents.
- Miscellaneous commands –
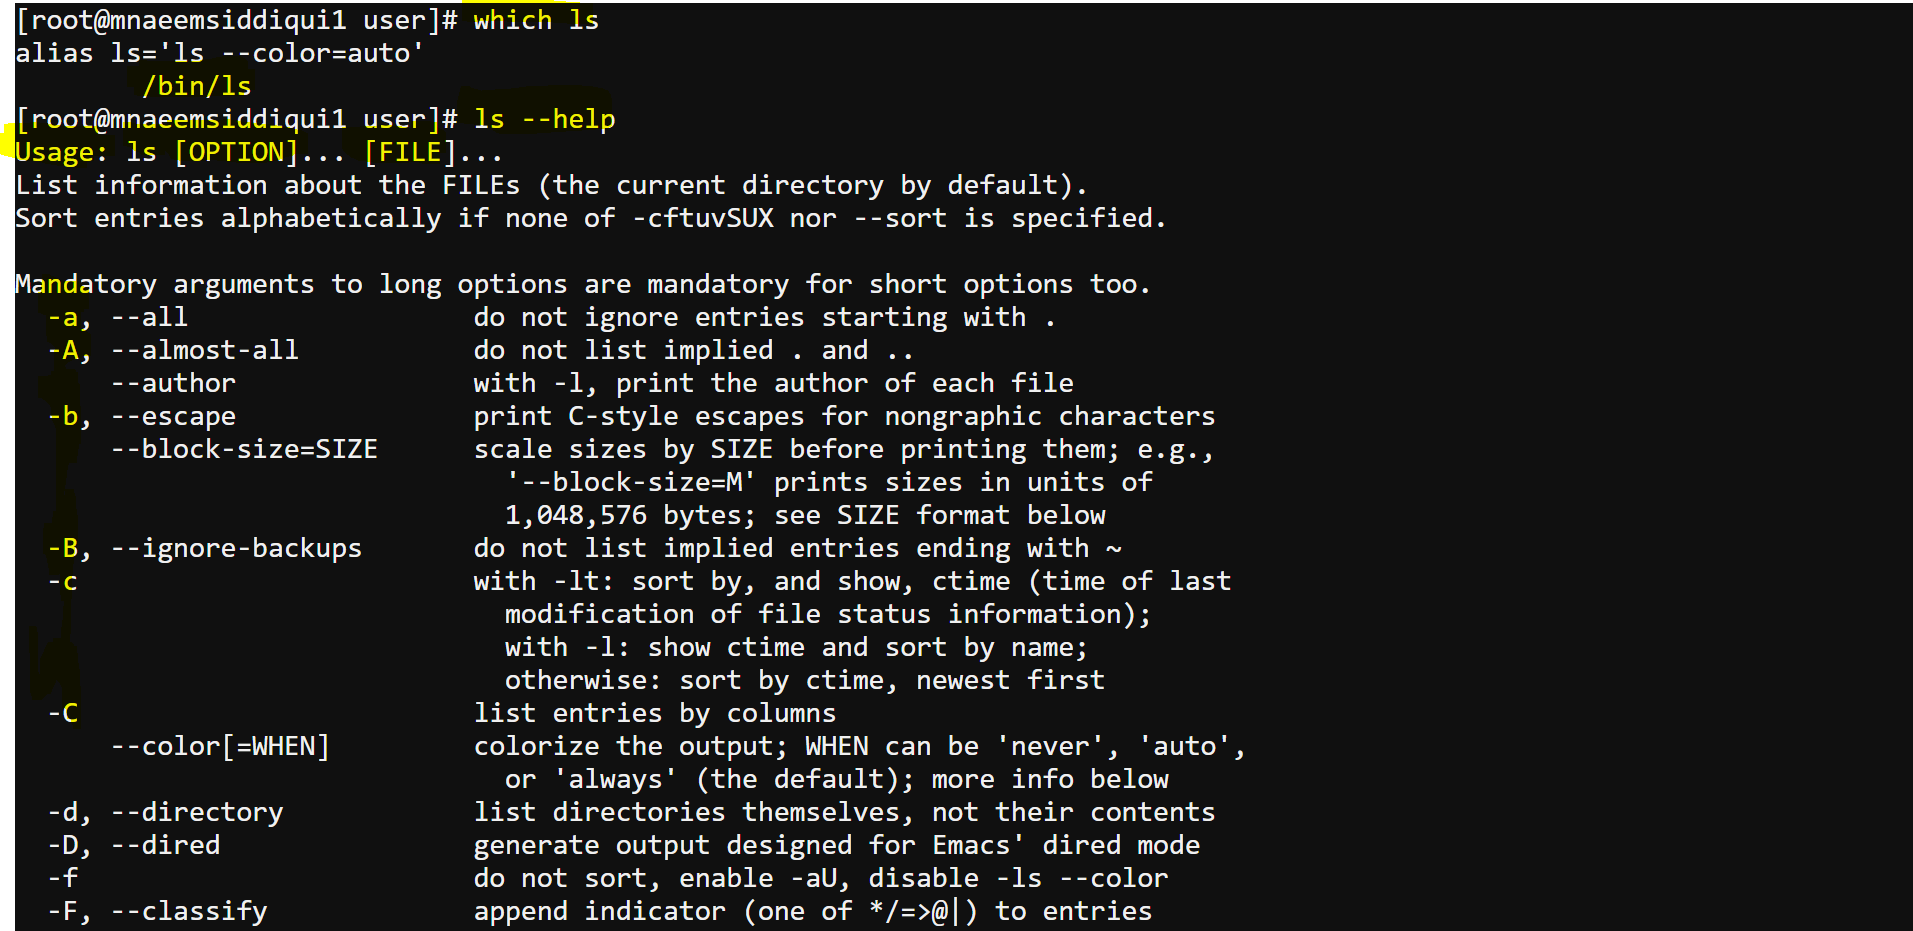
- which – locates a commands path – which mkdir
- help – get help on a command – ls –help
-
E..g for which and help
Linux Commands – Part 2 of 4
- Permissions in Linux –
- Linux supports permissions at file as well directory level by granting the permissions to users and group(group of users, a user must belong a at least one group but can belong to any number of groups).
- Any file or directory created under Linux has permissions at 3 levels – user or u(the owner or creator of the file/directory), group or g(the group to which owner belongs to) or other or o(those who are neither owners nor belong to owners group).
- Each group has 3 kinds of permissions (read or r– a bit value of 4, write or w– a bit value of 4, execute or x– a bit value of 1).
- There are 3 types – file(begins with ‘-‘, directory(begins with ‘d’) or link(begins with ‘l’)
- Please see the snapshot below with the long listing(ls -ltr) of user’s home folder:

- Lets analyse the permissions of the file – “apache-drill-1.12.0.tar.gz”:–rwxr–r–. 1 root root 207997613 Dec 14 14:35 apache-drill-1.12.0.tar.gz
- rwxr–r– :
- the first character ‘-‘ means that its a file
- for owner the permission is rwx i.e 4+2+1=7
- for group the permission is r– i.e 4
- for others the permission is r– i.e 4
- meaning the file has a permission of 744
- rwxr–r– :
- Lets analyse the permissions of the directory – “dir1”:- drwxr-xr-x. 2 root root 6 Jan 28 03:57 dir2
- drwxr-xr-x :
- the first character ‘d’ means that its a directory
- for owner the permission is rwx i.e 4+2+1=7
- for group the permission is r-x i.e 5
- for others the permission is r-x i.e 5
- meaning the directory has a permission of 755
- drwxr-xr-x :
- Chmod – command is used to change the permissions of a file/directory
- Chgrp – command is used to change the group of a file/directory
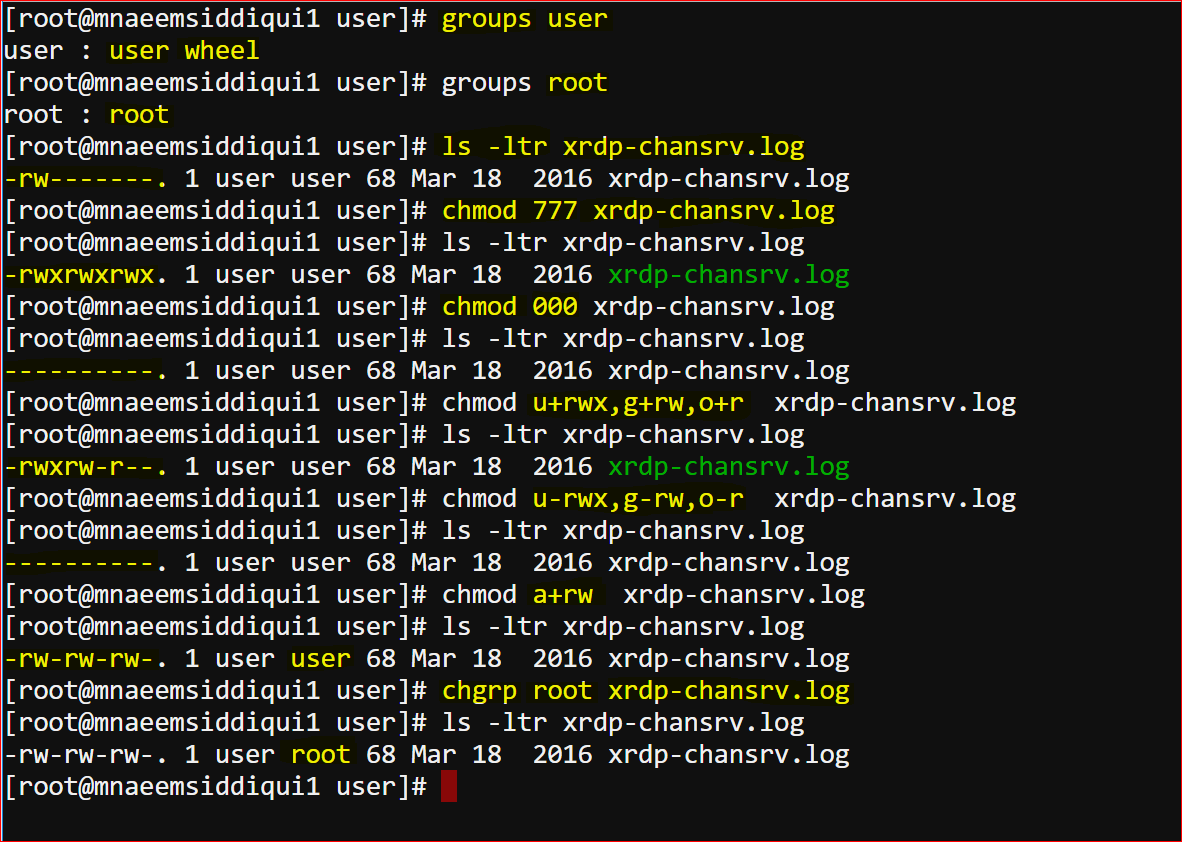
- root@mnaeemsiddiqui1 user]# groups user
user : user wheel ( means that the user belongs to a user group and wheel group(default)) - root@mnaeemsiddiqui1 user]# groups root
root : root ( means that the root belongs to a group root ) - root@mnaeemsiddiqui1 user]# ls -ltr xrdp-chansrv.log
-rw——-. 1 user user 68 Mar 18 2016 xrdp-chansrv.log (means that the file xrdp-chansrv.log has read and write permissions only for user(owner)) - chmod 777 xrdp-chansrv.log :
- [root@mnaeemsiddiqui1 user]# chmod 777 xrdp-chansrv.log ( we changed the mode to 777)
- [root@mnaeemsiddiqui1 user]# ls -ltr xrdp-chansrv.log
-rwxrwxrwx. 1 user user 68 Mar 18 2016 xrdp-chansrv.log (now the file as rwx permission to user, group and others)
- chmod 000 xrdp-chansrv.log :
- [root@mnaeemsiddiqui1 user]# chmod 000 xrdp-chansrv.log ( now we changed mode to 000)
- [root@mnaeemsiddiqui1 user]# ls -ltr xrdp-chansrv.log
———-. 1 user user 68 Mar 18 2016 xrdp-chansrv.log(now the file as no permission to user, group and others)
- chmod u+rwx,g+rw,o+r xrdp-chansrv.log :
- [root@mnaeemsiddiqui1 user]# chmod u+rwx,g+rw,o+r xrdp-chansrv.log ( we gave user(u) a rwx permission, group(g) a rw and others(o) a r permission)
- [root@mnaeemsiddiqui1 user]# ls -ltr xrdp-chansrv.log
-rwxrw-r–. 1 user user 68 Mar 18 2016 xrdp-chansrv.log(now the file as rwx permission to user and rw group and others)
- chmod u-rwx,g-rw,o-r xrdp-chansrv.log :
- [root@mnaeemsiddiqui1 user]# chmod u-rwx,g-rw,o-r xrdp-chansrv.log( we took away from user(u) a rwx permission, group(g) a rw permission and others(o) a r permission)
- [root@mnaeemsiddiqui1 user]# ls -ltr xrdp-chansrv.log
———-. 1 user user 68 Mar 18 2016 xrdp-chansrv.log
- chmod a+rw xrdp-chansrv.log :
- [root@mnaeemsiddiqui1 user]# chmod a+rw xrdp-chansrv.log(we gave a rw permission to all)
- [root@mnaeemsiddiqui1 user]# ls -ltr xrdp-chansrv.log
-rw-rw-rw-. 1 user user 68 Mar 18 2016 xrdp-chansrv.log
- chgrp root xrdp-chansrv.log :
- [root@mnaeemsiddiqui1 user]# chgrp root xrdp-chansrv.log ( we changed the group of the file ‘xrdp-chansrv.log’ from user to root)
- [root@mnaeemsiddiqui1 user]# ls -ltr xrdp-chansrv.log
-rw-rw-rw-. 1 user root 68 Mar 18 2016 xrdp-chansrv.log
- Viewing the content of a file:
- You can use – head, tail, less, more, cat
- You can also user editors like – vi or nano
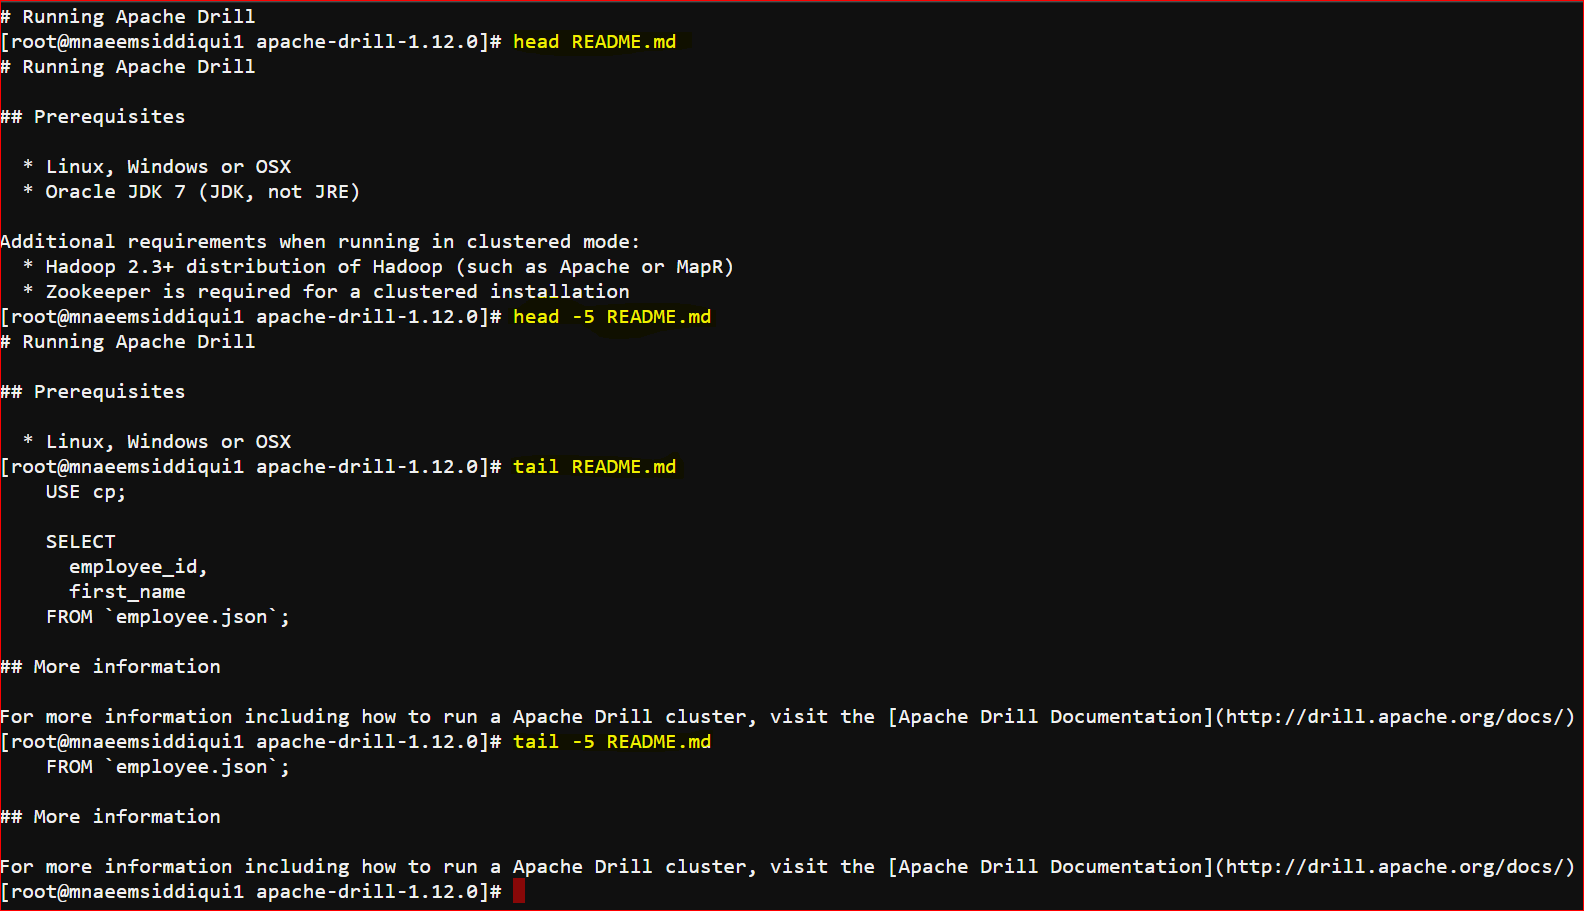
- To view top 10(default) lines of a file – head filename.txt
- To view top n( say 5) lines of a file – head -5 filename.txt
- To view bottom 10(default) lines of a file – tail filename.txt
- To view bottom n( say 5) lines of a file – tail -5 filename.txt
- To view the contents of a file(one screenful at a time) – more filename.txt
- To view the contents of a file(one screenful at a time) – less filename.txt
- To view the contents of a file(all content, but last screenful is visible)- less filename.txt
- In less command has more features than less, both command show only portion of the file you can see on the screen, pressing enter keeps you moving ahead and pressing ‘q’ will quit out of file.
- nano – is a simple editor
- create or open a file – nano test.data
- to save – Ctrl+X then choose Y or N on prompt and then filename on prompt.
- other commands and help is available on the editor itself.
- vi – is an advanced editor
- create or open a file – vi test.data
- To add test (activate insert mode) – press i
- To deactivate insert mode – press Esc
- To save file – :wq!
- more featured vi – vim test.data
- read only vi – view test.data
- Editor command for vi –
- k – 1 line up.
j – 1 line down.
h – 1 character left.
l – 1 character right.
w – 1 word right.
b – 1 word left.
^ – to beginning of line.
$ – to end of line.
- k – 1 line up.
q – 1 word right.
q! – 1 word left.
w – to beginning of line.
w! – to end of line.
wq – 1 word right.
wq! – 1 word left.
i or I – to activate insert mode (‘i’ to insert at cursor position, ‘I’ to insert at beginning of line).
a or A – to activate append mode (‘a’ to append at cursor position, ‘A’ to append at beginning of line). .
set nu – enable line numbers.
set nonu – disable line numbers.
dw – to delete a word.
dd – to delete a line.
cw – change whole word.
cc – change whole line.
yy – to copy.
p – to paste.
/{pattern} – Forward search for {pattern}
?{pattern} – Reverse search for {pattern}
- Finding Files and directories:
- There are 2 commands – find and locate
- find – finds the files based on the name/path specified
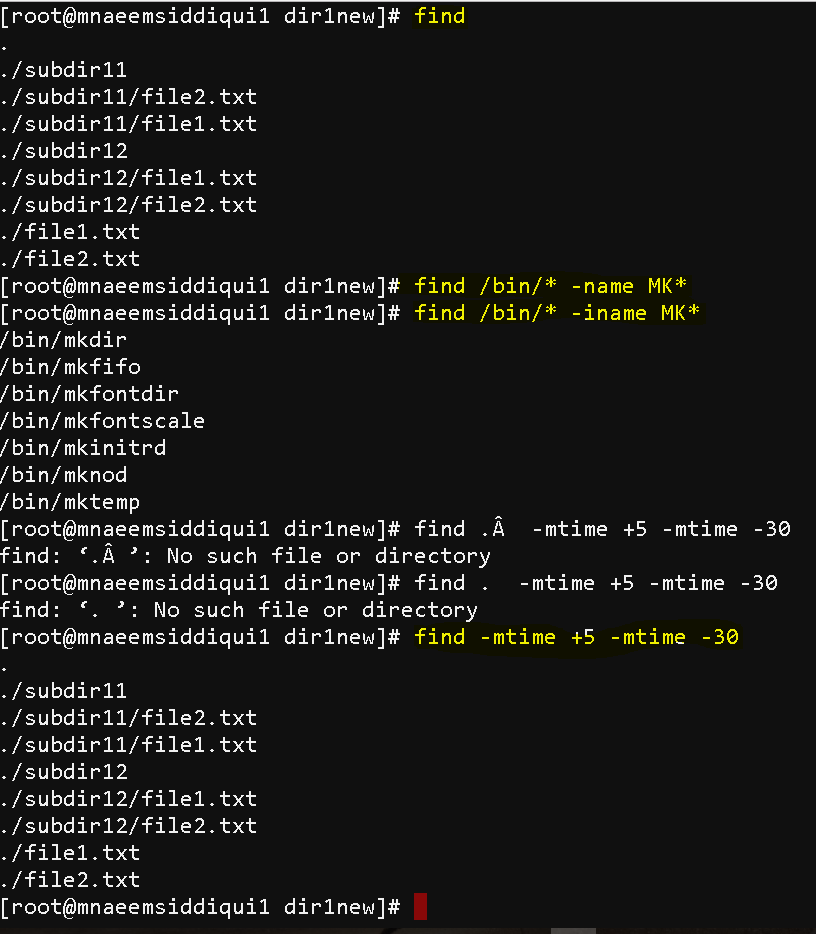
- to find everything in current path – find
- to find all files in /bin folder with name like MK* (by default search is case sensitive, see in the snapshot that case sensitive search does not return any value, but case sensitive search returns files) – find /bin/* -name MK*
- to find all files in /bin folder with name like MK* (case insensitive search) – find /bin/* -iname MK*
- to search all file modified in current directory which are more than 5 days old but less than 30 days old – find -mtime +5 -mtime -30
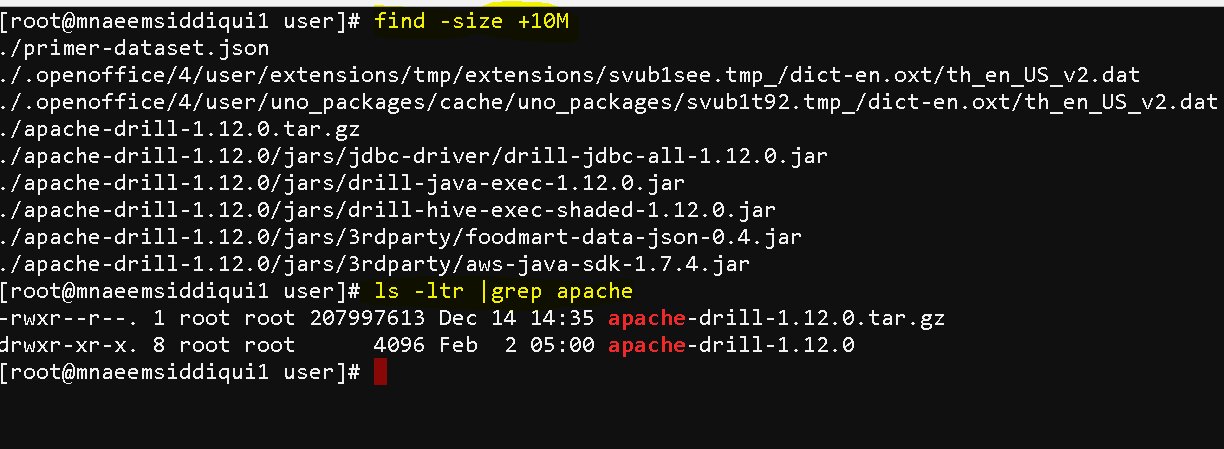
- return files of size bigger than 10 MBs – find -size +10M
- return files using piping(piping is used to output the result of one command as input to the other) – ls |grep apache
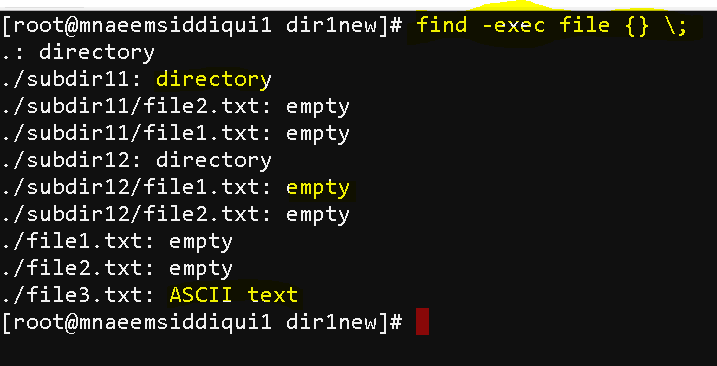
- To find the filetypes – find -exec file {} \;
- locate – locate command is like find but uses patterns:
- unlike ‘find‘ which traverses through all items provided in the path tp find a file
- locate uses indexes that why its faster then ‘find’
- But has a draw back due to indexes –
- its is not real time like ‘find’
- if the index is not updated then results in locate are also not updated
- indexes are rebuilt everyday, so the results might be a day stale
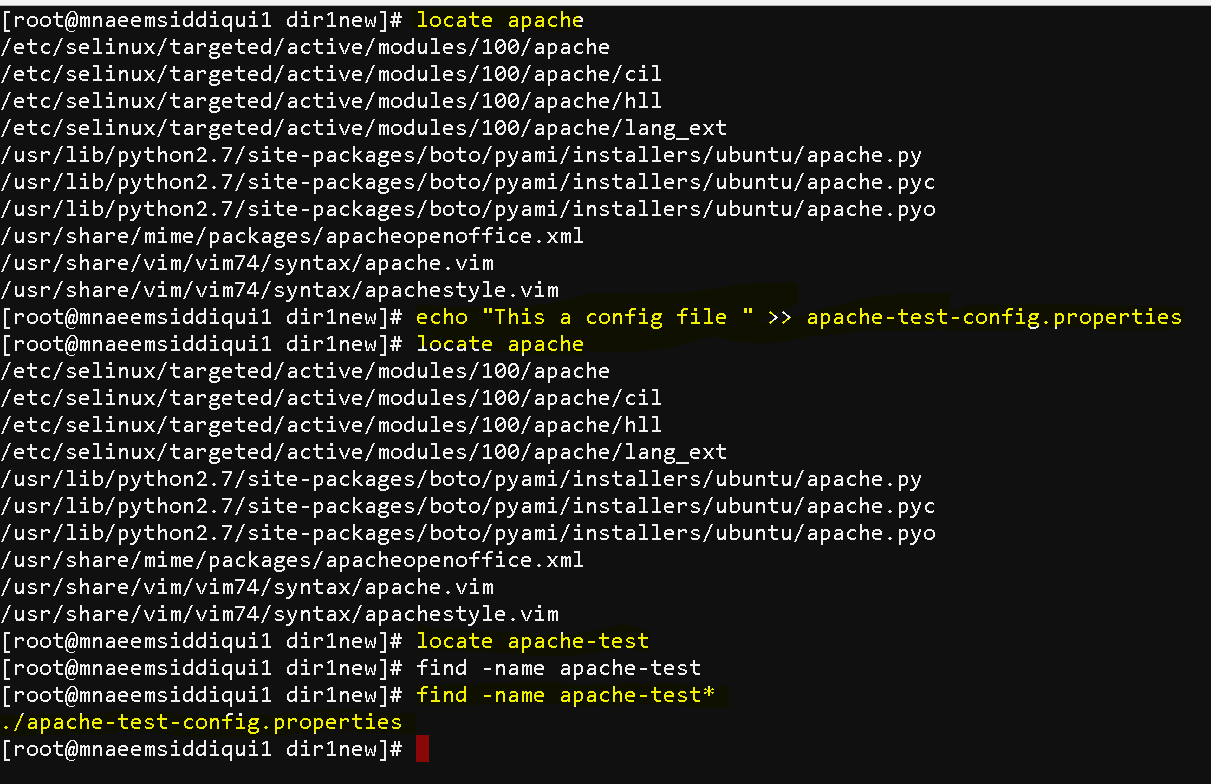
- lets search using all files named ‘apache’ in current directory ( we see some results) – locate apache
- Now lets create a new file with ‘apache’ word in its name – echo “This a config file ” >> apache-test-config.properties
- Now lets search (this new file is not shown in the search as the index is not rebulit) – locate apache or locate apache-test
- but if we use ‘find’ it will show you the file – find -name apche-test*
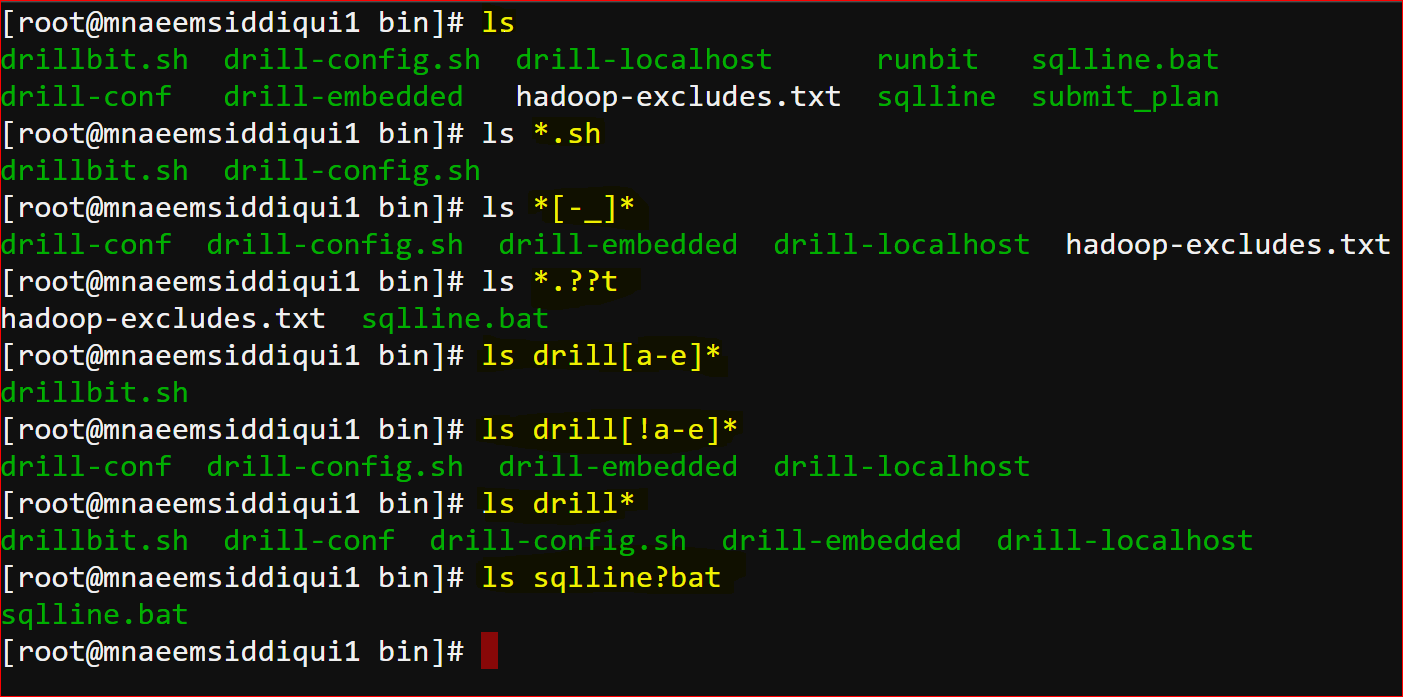
- Wild cards:
- a character of string for pattern matching
- ? – matches exactly one character
- ca? will match for can or cat
- * – matches zero or more character(s)
- c*t can match for cat, catch, connect
- [] – called character class matches the characters listed inside
- c[aeiou]* can match for can, candy, cereal etc
- [!] – matches the characters not listed inside
- c[!ae]* can match for cut, city etc
- [0-9] or [b-g] – matches the characters in the range
- file[3-7] can match for file3, file4, …file7
- file[b-g] can match for fileb, filec, …fileg
- \ – used to match the escape sequence
- file\? will match file?
Linux Commands – Part 3 of 4
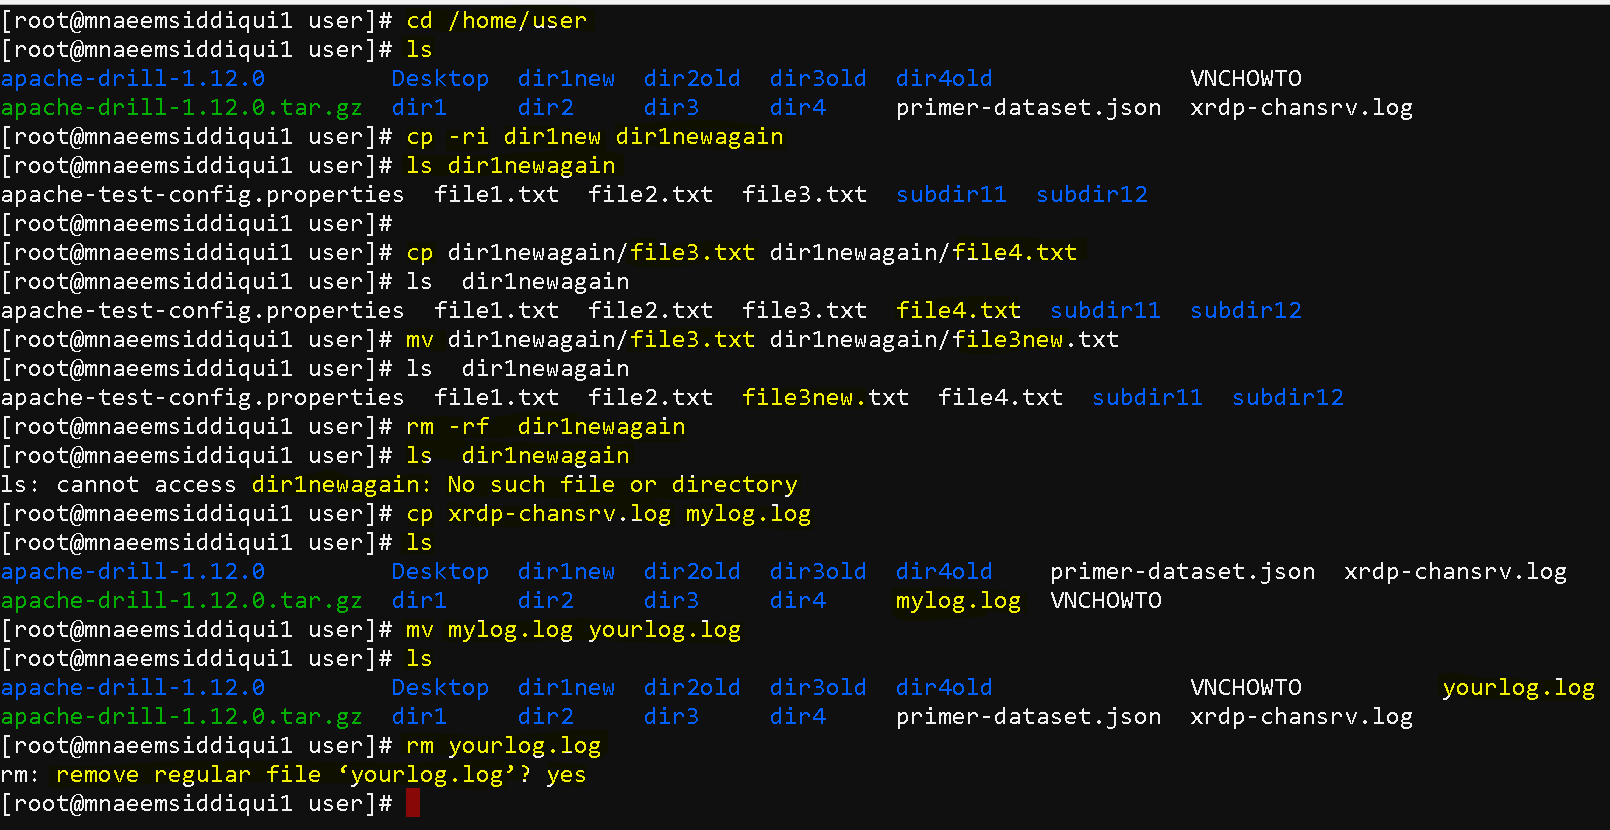
- Delete, Copy, Remove, rename files:
- Remove a file – rm filename
- Remove a directory and its contents- rm -r filename
- Remove a directory and its contents forcefully – rm -rf filename
- Using search patterns to delete multiple files or directories ( first use an ls command to see if what files will be deleted) – rm file*
- copy files from source to directory – cp sourcepath destinationpath
- copy in interactive mode – cp -i sourcepath destinationpath
- copy recursive – cp – r sourcepath destinationpath
- renaming a file – mv oldfileordirname newfileordirname
- moving a file – mv oldpathtoafile newpathtoafile
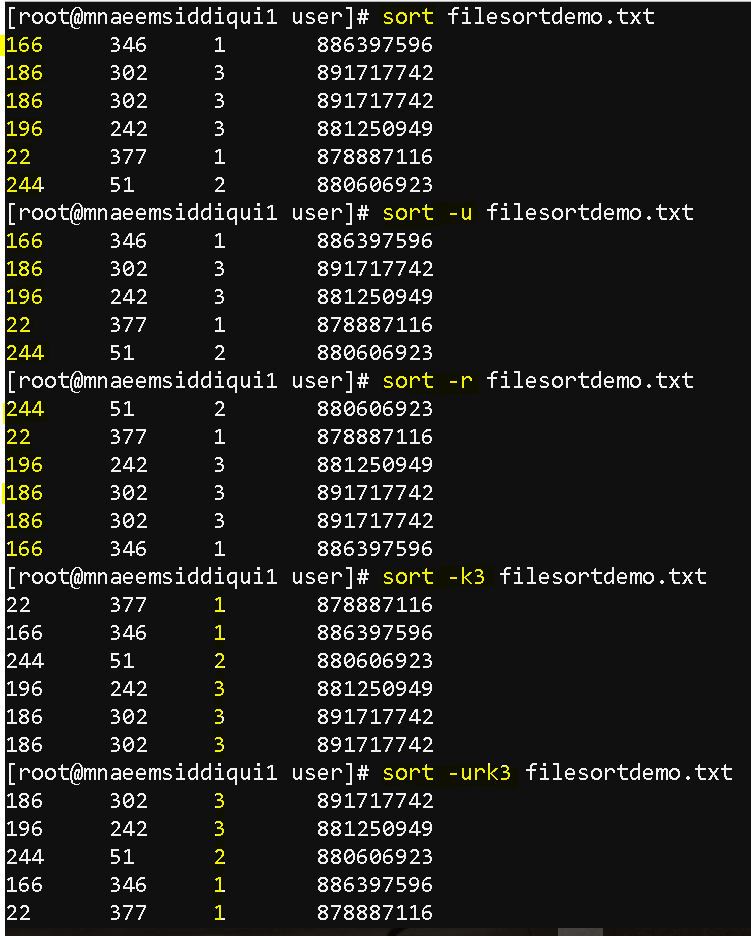
- Sorting data inside a file:
- To sort data inside a file – sort filename
- To sort data inside a file in reverse order – sort -r filename
- To sort data inside a file unique lines – sort -u filename
- To sort data inside a file based on any other column rather than 1st (default column) – sort -k 2 filename ( sorts on 2nd column)
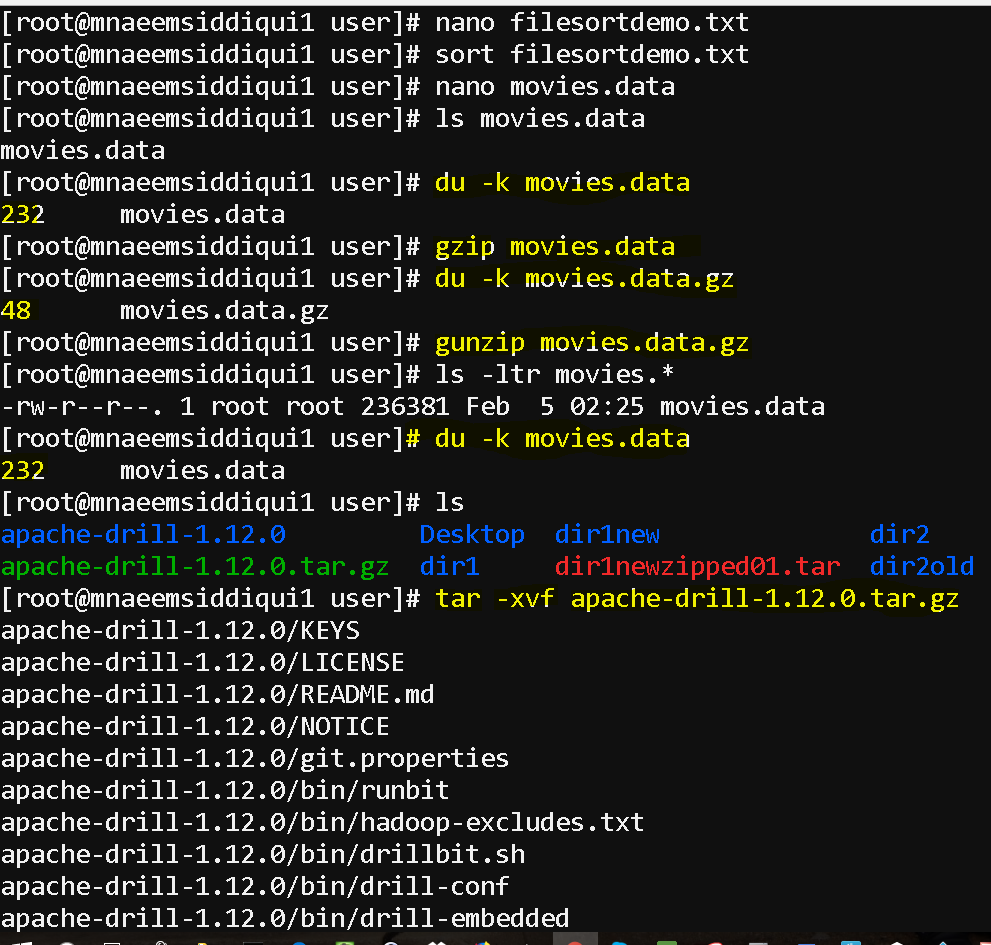
- Zipping and Un-Zipping files:
- to zip a file – tar cvf filename.tar fileordirectoriestozip
- to unzip a file – tar xvf filename.tar fileordirectoriestozip
- options – ‘x’ to extract, ‘c’ to create, ‘v’ to verbose, ‘f’ to specify tar file name, ‘z’ to compress a file.
- Compressing and Un-Compressing files:
- to find the disk usage of a file – du -k <fileordirname
- to compress a file/directory – gzip filename
- to uncompress a file/directory – gunzip filename.gz
- to uncompress a tar file – tar -xvf apache-drill-1.12.0.tar.gz
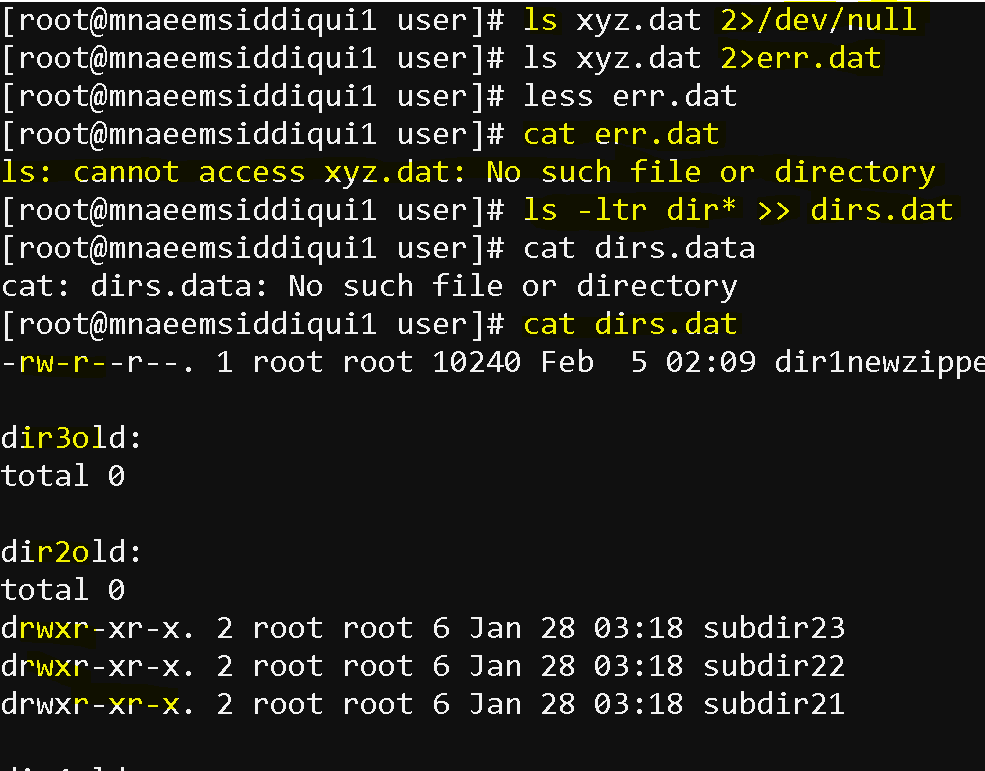
- Input, Output and Error Redirection:
- There are 3 types of Input/Output/Error Types:
- Standard Input – stdin – 0 ( keyboard)
- Standard Output – stdout – 1 (screen)
- Standard Error – stderr – 2 (screen)
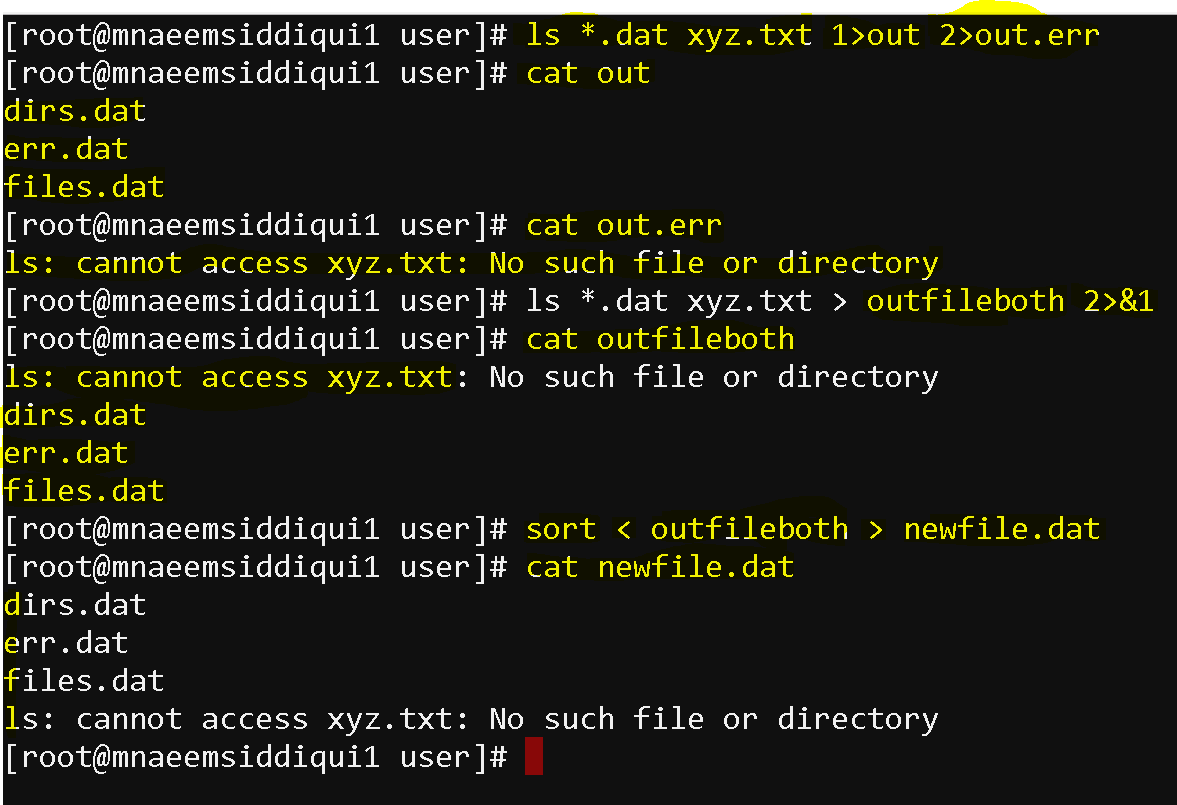
- > – redirects and overwrites the standard output to a file
- >> – redirects and appends the standard output to a file
- < – redirects the input from a file to the command
- 2&1 – combines standard output and input
- 2>file – redirects standard error to a file
- – hides the error
- There are 3 types of Input/Output/Error Types:
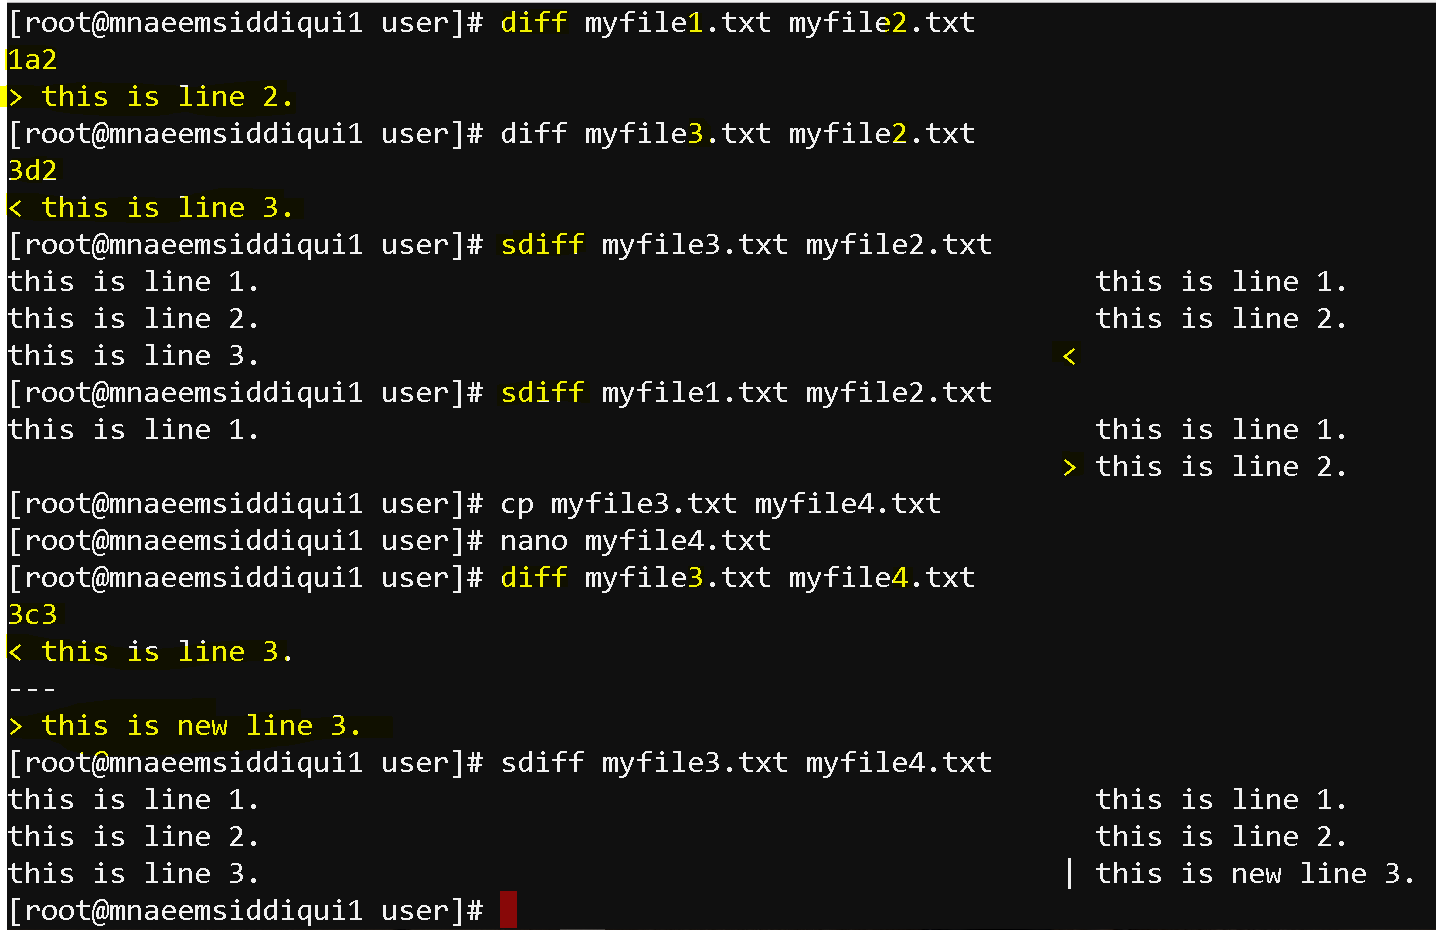
- Comparing contents of a file:
- compare difference between 2 files – diff fil1 file2
- It shows the difference an ‘a'(addition) or ‘c'(change) or ‘d'(delettion)
- E.g.
- 1a2 – means in difference is on line 1 and 2 and line 2 is added
- 3c3 – means on line 3 in both files there is some change
- 3d2 – means difference is the deletion and line 3 is deleted in file
- compare difference between 2 files side by side – sdiff fil1 file2
- difference is shown as
- > (the 2nd file has extra lines) or
- < (first file has extra lines or
- | ( change is content on same line)
- difference is shown as
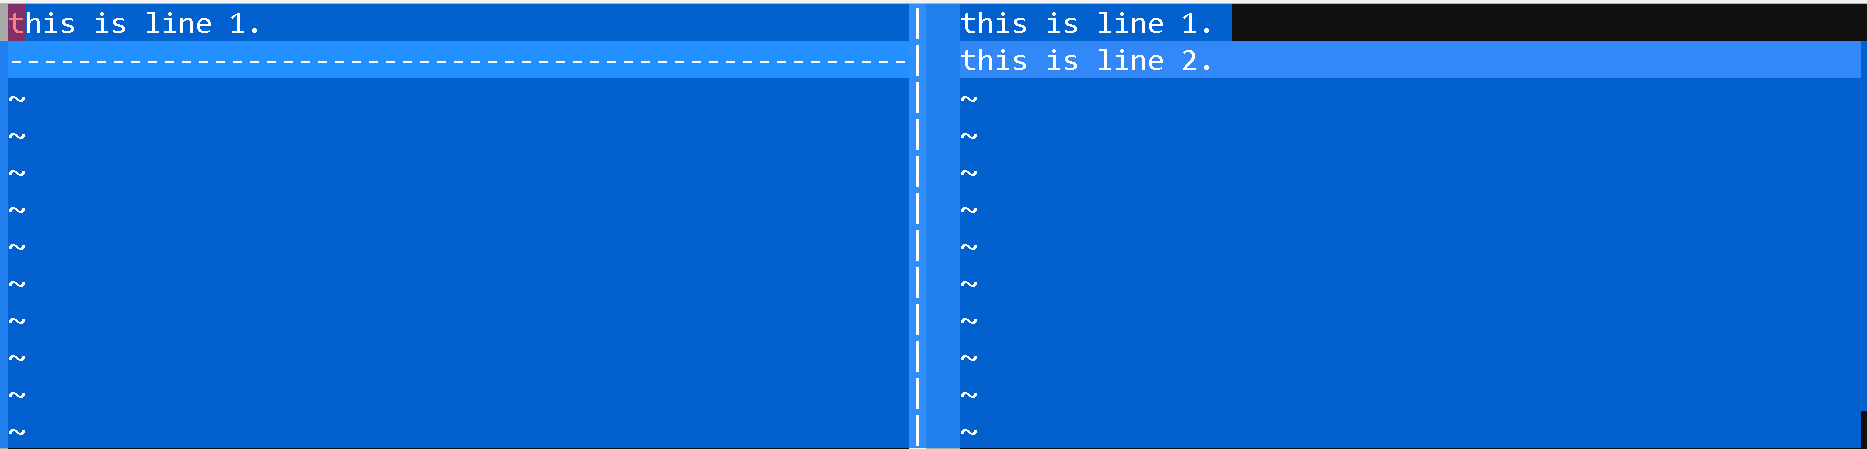
- compare difference between 2 files on graphical editor – vimdiff fil1 file2
- show the difference visually
- vimdiff myfile1.txt myfile2.txt
- it opens 2 vi editors to compare as well as you can edit inline
- Once compared, you have to exit files by doing escape and :q for both files to come out just like you do for vi editor
- show the difference visually
- compare difference between 2 files – diff fil1 file2
- Search for data in files and using pipes:
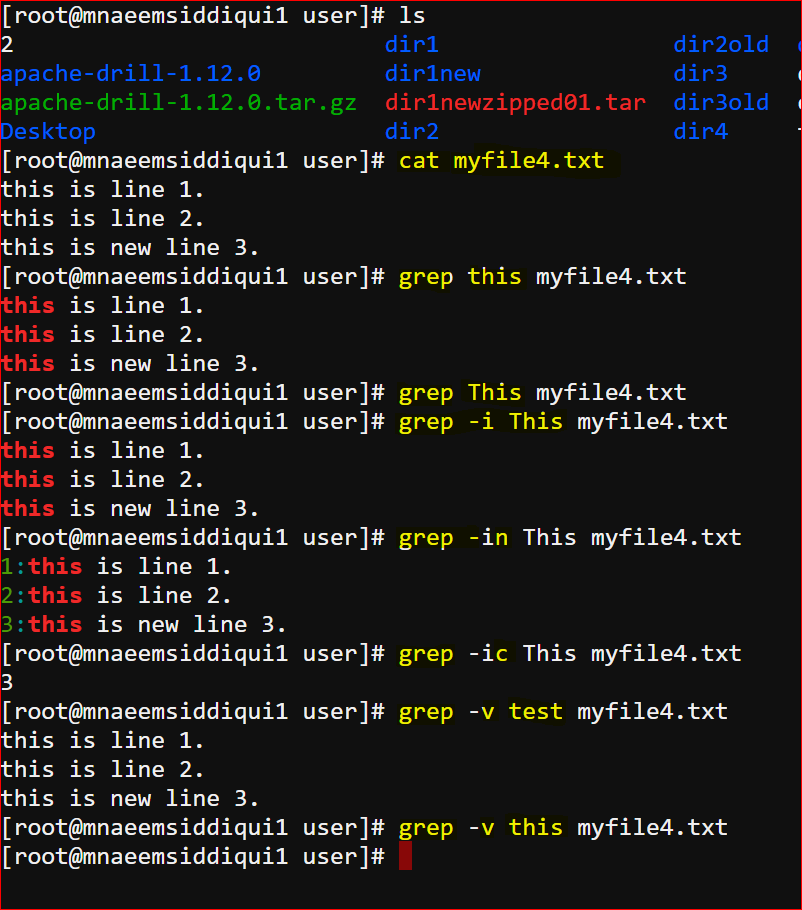
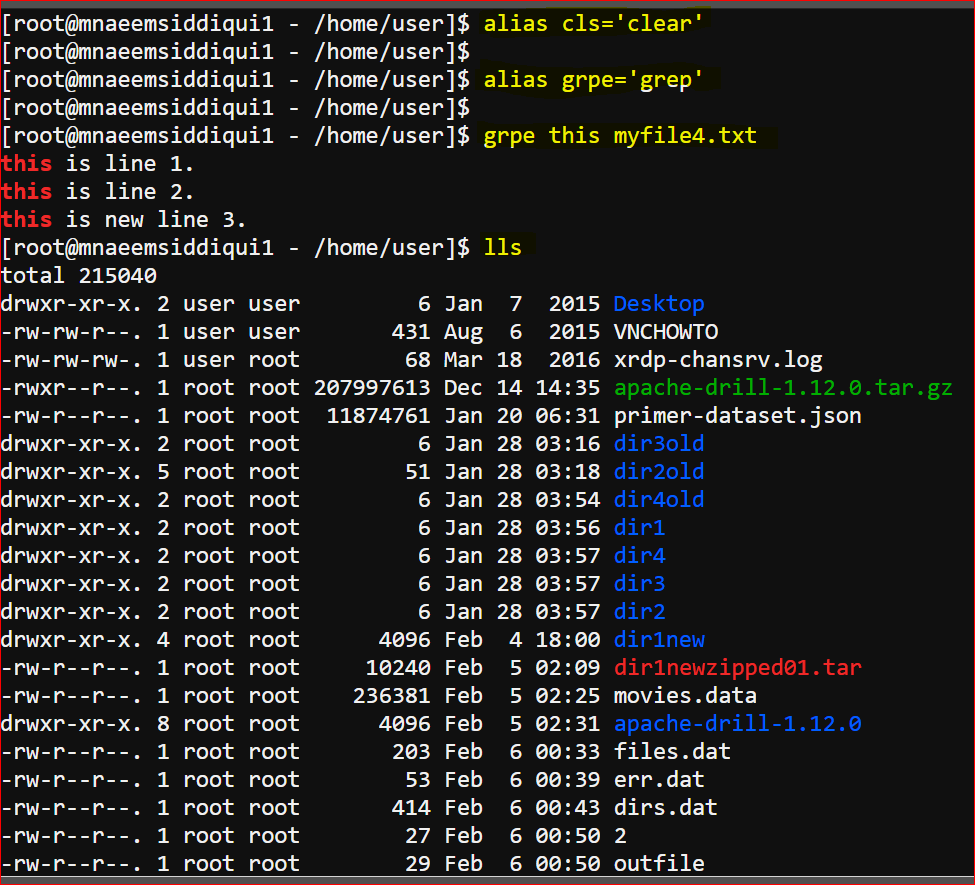
- grep command :
- grepgrep command is used to search for patterns
- -options searchpattern filename
- options are :
- -i for ignore case
- -c for count of occurrences
- -n for line numbers
- -v for those lines which don’t match
- e.g grep This myfile.txt
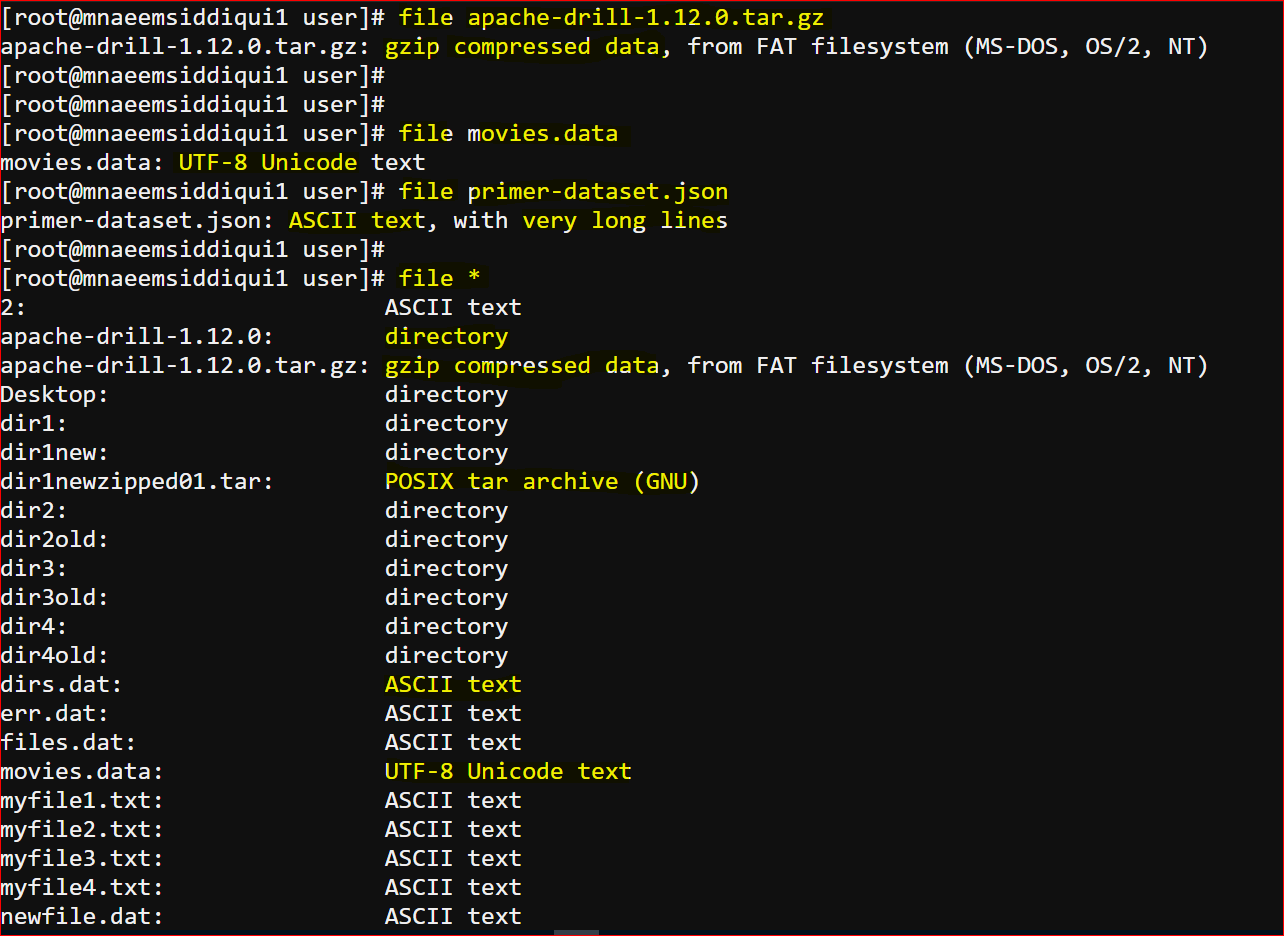
- file command :
- file command is used to know file types
- file myfile.txt will return that its an ASCII file
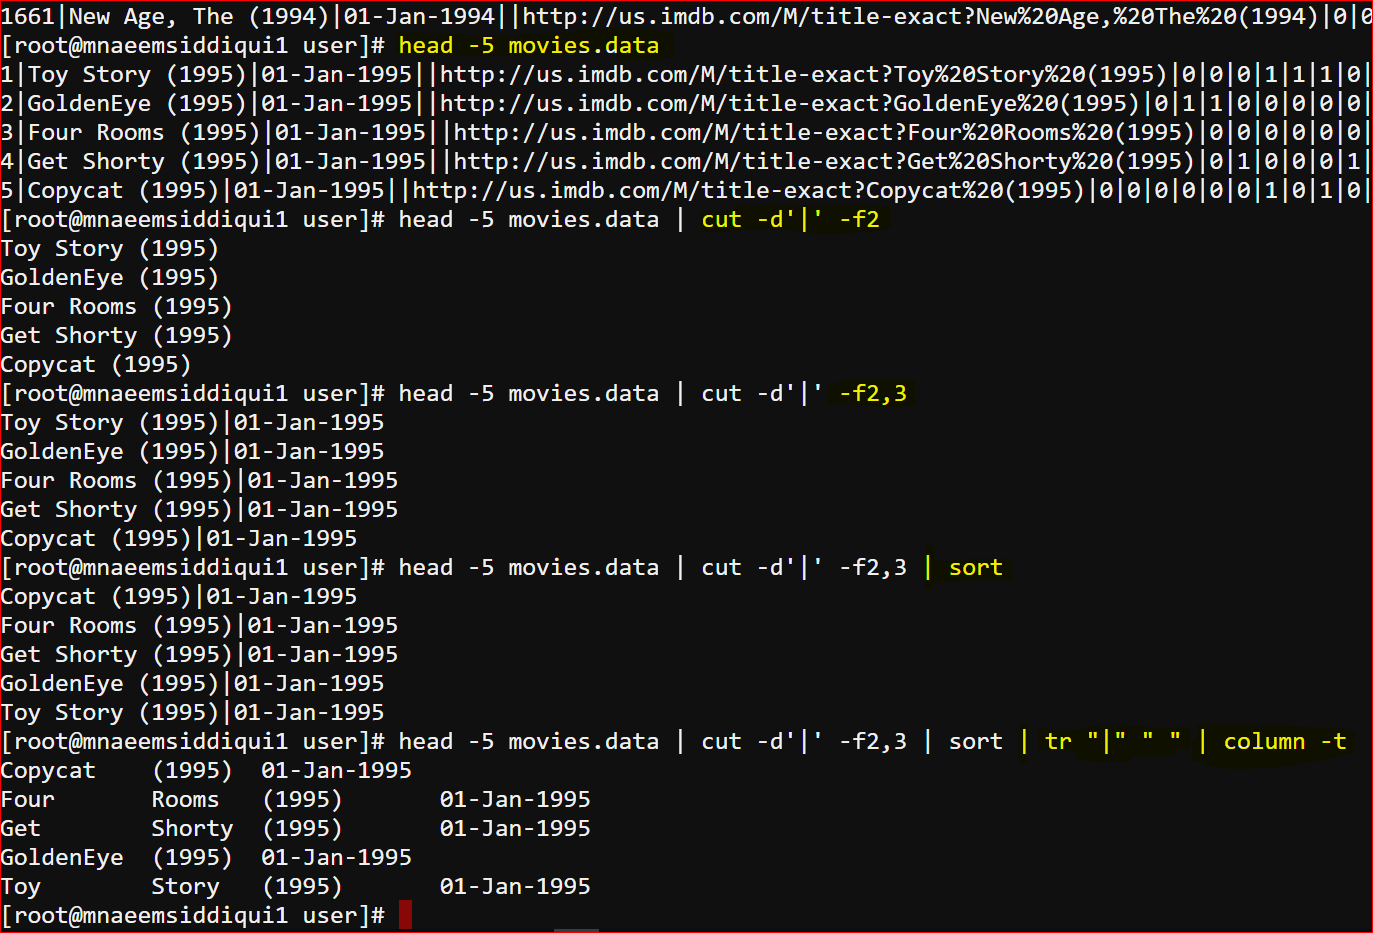
- cut command:
- cut command is used to cut field names out of a file based on the delimiter
- cut -d’|’ -f3 – this command will cut out the 3rd field of a pipe delimited file.
- tr and column commands
- tr command is used to translate one character to the other
- e.g. tr “|” “,” – will convert all pipes to commas.
- very helpful command if you want to change the delimiter of a file
- column command is used to show data in tabular way
- e.g column -t – will show data as a table
- tr command is used to translate one character to the other
- pipe(|) :
- is used to takes the standard output of a command and pass it as standard input to a file
- ls | sort – will list sort the file listing
- ifconfig -a | grep 192 – will search for a line having 192 in ifconfig(list of networkadapters and theirs IPs)
- To understand tr, column, pipe command together lets analyse the code below:
- to show just top 5 lines of the movies.data file – head -5 movies.data
- We see 5 lines with movieid, moviename, realeasedate etc with pipe delimiter.
- Now pipe above output to only filter movie name (cut command will cut the lines by ‘|’ delimiter (-d ‘|’)and then -f2(will show 2nd field) : head -5 movies.data | cut -d’|’ -f2
- Similarly to return 2nd and 3rd column both use -f2,3 – head -5 movies.data | cut -d’|’ -f2,3
- To sort above output – head -5 movies.data | cut -d’|’ -f2,3 | sort
- To translate the pipes from the output use tr “|” ” ” – head -5 movies.data | cut -d’|’ -f2,3 | sort | tr “|” ” ”
- then finally to show the above output as table – head -5 movies.data | cut -d’|’ -f2,3 | sort | tr “|” ” ” | column -t
- grep command :
- Copy files over the network:
- there are lot of command line as well as graphical tools to copy data across the network
- Command line tools( basically these tools are called clients):
- scp – secure copy – on Mac as well Linux
- sftp – ssh/secure file transfer protocol – on Mac as well Linux
- Windows has its own executable clients called as pscp.exe and psftp.exe (Putty secure copy and Putty secure file transfer protocol)
- GUI Clients:
- Filezilla – all platforms
- WinSCP – windows only etc
- MobaXterm – is an SSH as well as FTP tool (My favorite)
- Lets understand the commands in the screen shot below:
- Using sftp :
- To explain File transfers over the network I have opened two Linux console windows side by side : one connected to [email protected] ( left side) and another to [email protected] ( right side)
- On the left side I am executing command – sftp user@[email protected] and providing the password to sftp to the server on the right side. After successful connection I get a ftp shell.
- I am using commands ls and pwd to to see the contents of the remote servers home directory.
- Now to upload the file to the remote server – put <filenames> e.g. put myfile.txt
- On the remote server initially there were only 3 files after doing a listing (ls).
- But after uploading the files, now there are 7 files ( 4 of the uploaded files).
- The I created one file on the remote server – myfilex.txt
- To download the remote file I used – get <myfile(s)> e.g. get myfilex.txt
- Then I listed that file to verify if the download was successful.
- Similarly you can use rm to remove the files remotely
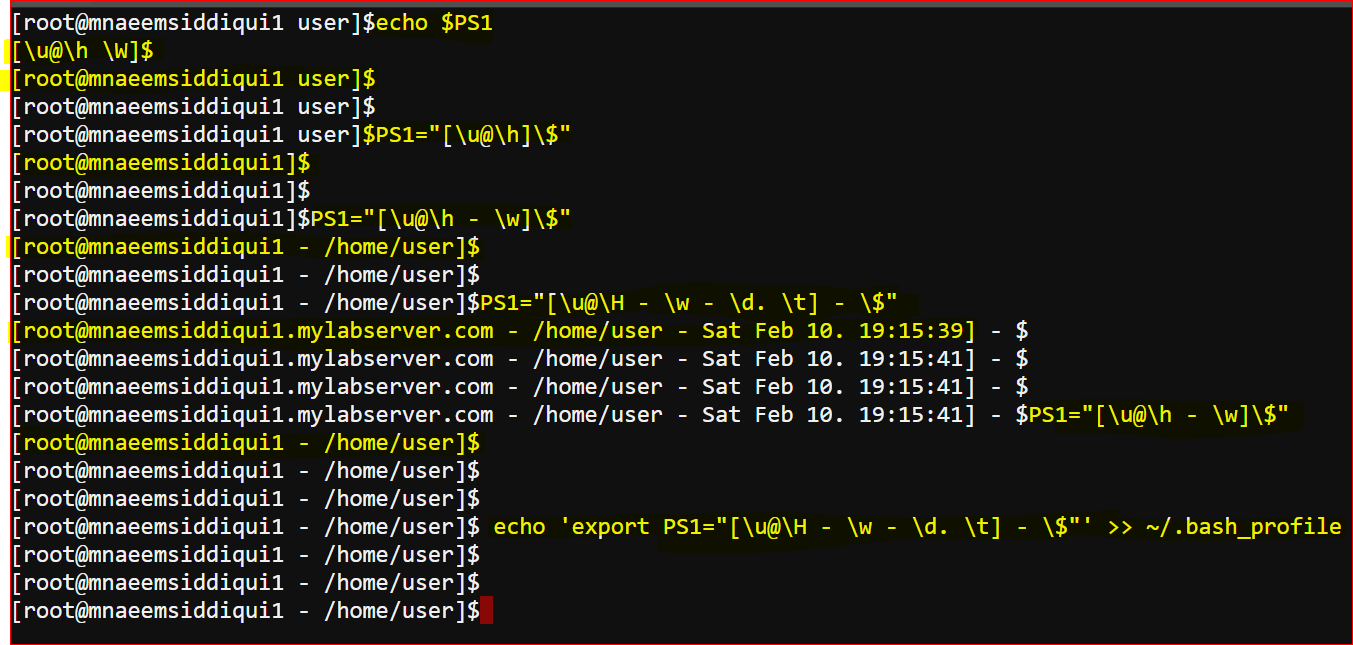
- Customizing the Shell Prompt
- Bash and Sh shells use environment variable $PS1 to customize the shell prompt
- \d – for showing date
- \h – to show host name only till first period
- \H – to show fully qualified host name
- \t – to show 12 hr time format
- \T to show 24 hr time format
- \n – to show new line
- \u – user name
- \w – current working directory
- \W – base folder name
- echo $PS1 – shows current setting for shell prompt
- PS1=”[\u@\h]\$” – sets user name and hostname
- PS1=”[\u@\h – \w – \d. \t] – \$” – sets user name, hostname, date and time
- To persist your changes update ~/.bash_profile
- echo ‘export PS1=”[\u@\H – \w – \d. \t] – \$”‘ >> ~/.bash_profile
- Bash and Sh shells use environment variable $PS1 to customize the shell prompt
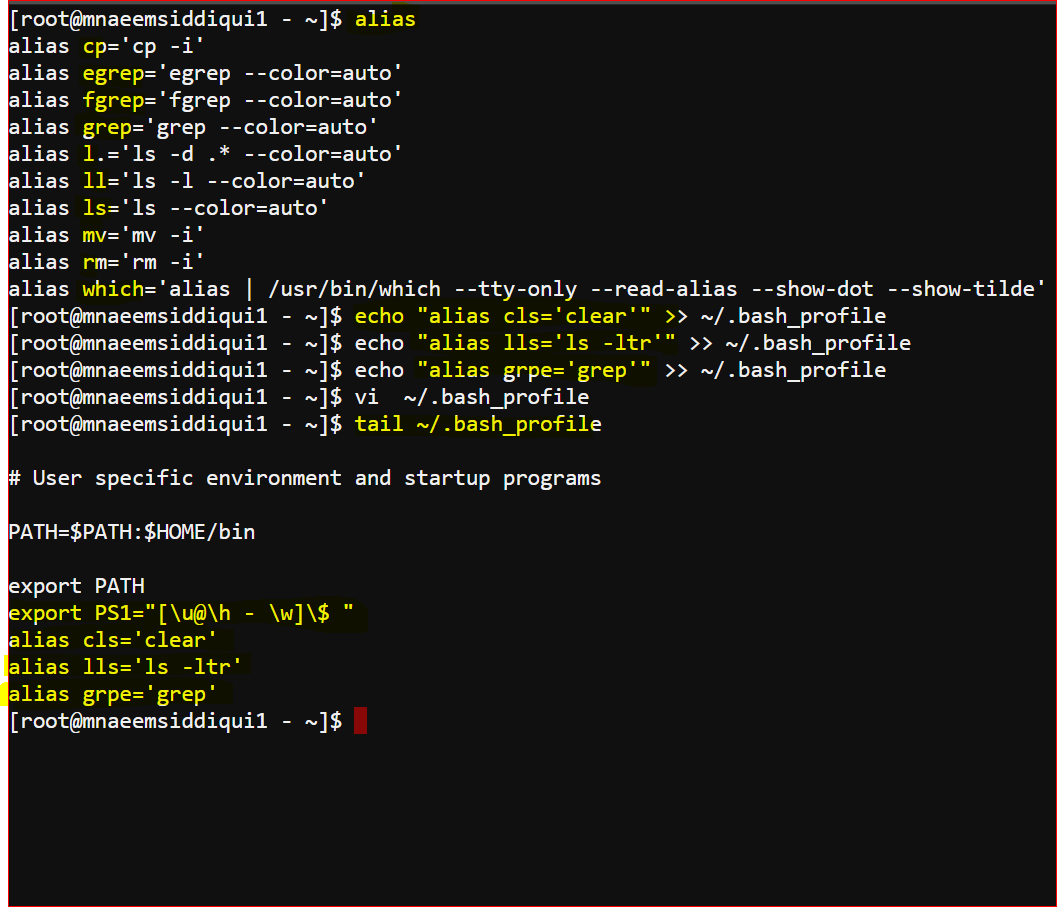
- Using Aliases
- are used
- to create short cuts for a long repetitive command
- alias cls=’clear’ – now you can also use cls in addition to clear to clear screen.
- alis lls = ‘ls -ltr’ – lls is an alias for long listing
- some times fix typos – e.g
- alias grpe=’grep’ – now you can you can use grpe and alias will use it as an alias
- Making these changes parmanent
- To view existing aliases – alias
- Saving changes permanently
- echo “alias cls=’clear'” >> ~/.bash_profile
- echo “alias lls=’ls -ltr'” >> ~/.bash_profile
- echo “alias grpe=’grep'” >> ~/.bash_profile
- to create short cuts for a long repetitive command
- are used
Linux Commands – Part 4 of 4
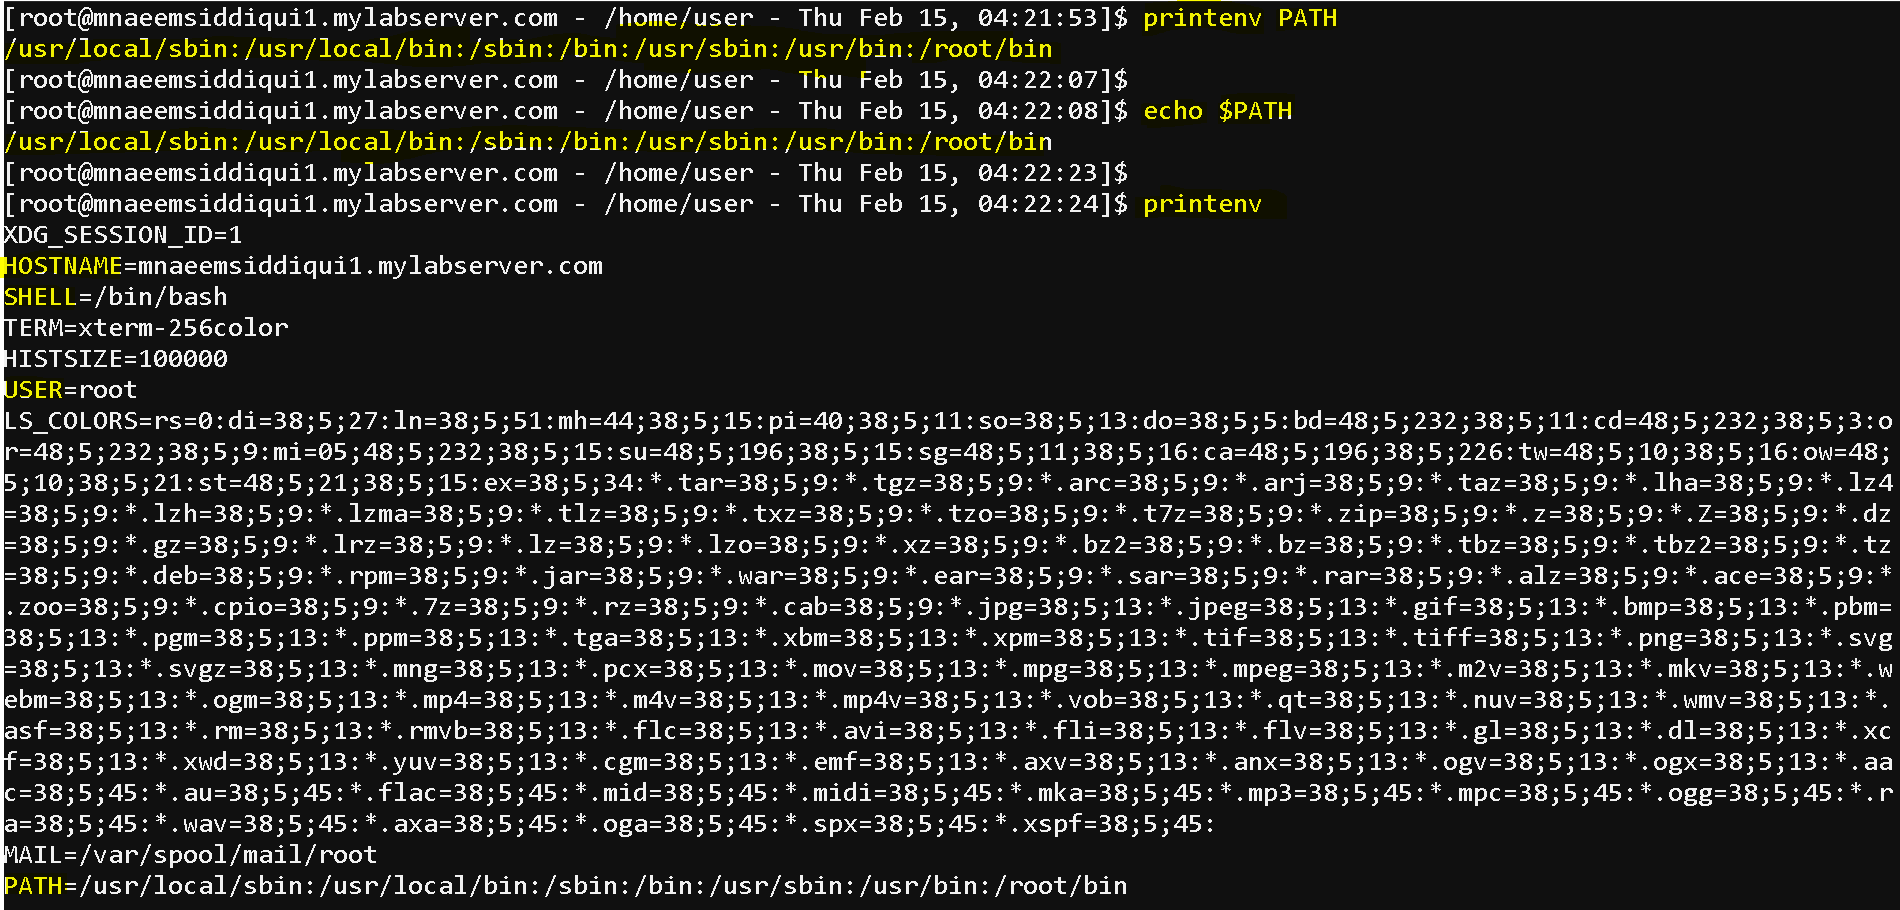
- Environmental variables:
- To print a list of all environmental variables – printenv
- To print a only one of all environmental variables (say HOME) – printenv HOME or echo $HOME
- To create an environmental variable – export variable= value e.g export EDITOR=”nano” or export SPARK_MAJOR_VERSION=2

- To make environment variable changes update – ~/.bash_profile
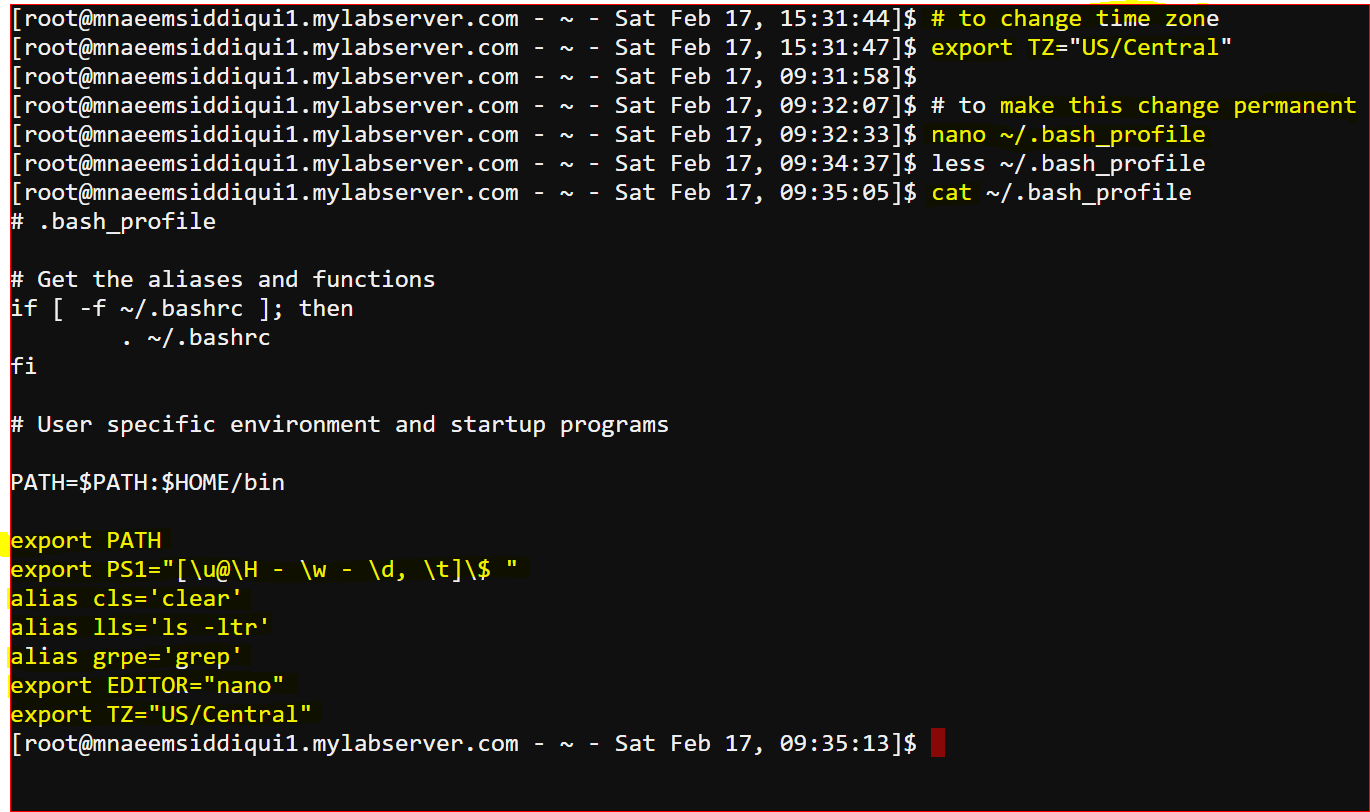
- To set a environment variable – export TZ=”US/Central”
- To unset a environment variable – unset TZ
- Process Management in Linux:
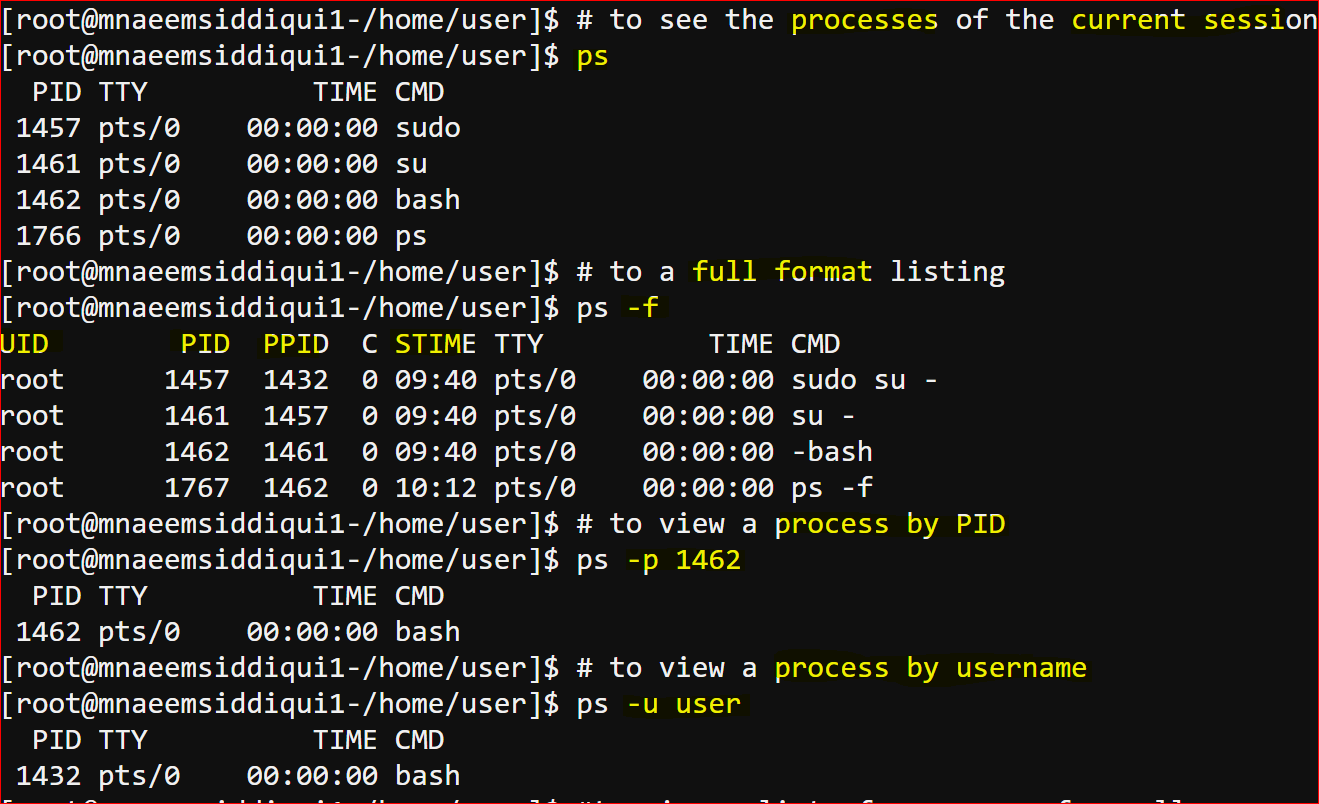
- To display a list of all processes running on current session : ps
- To display a list of all processes running from all users : ps -ef
- To display a list of all processes by username : ps -u root
- To display a list of all processes by process id : ps -p 1005
- To display the list as a tree – ps -H or ps –forest or pstree
- can use top to see interactive listing like – top tree
- Foreground and background processes:
- Foreground processes – all programs you are running using command line or GUI
- background process – process that run in background specially long running.
- To kill a process – kill PID
- To move a process to background – bg PID
- To move a process to foreground – fg PID
- Lets go for a few exapmles
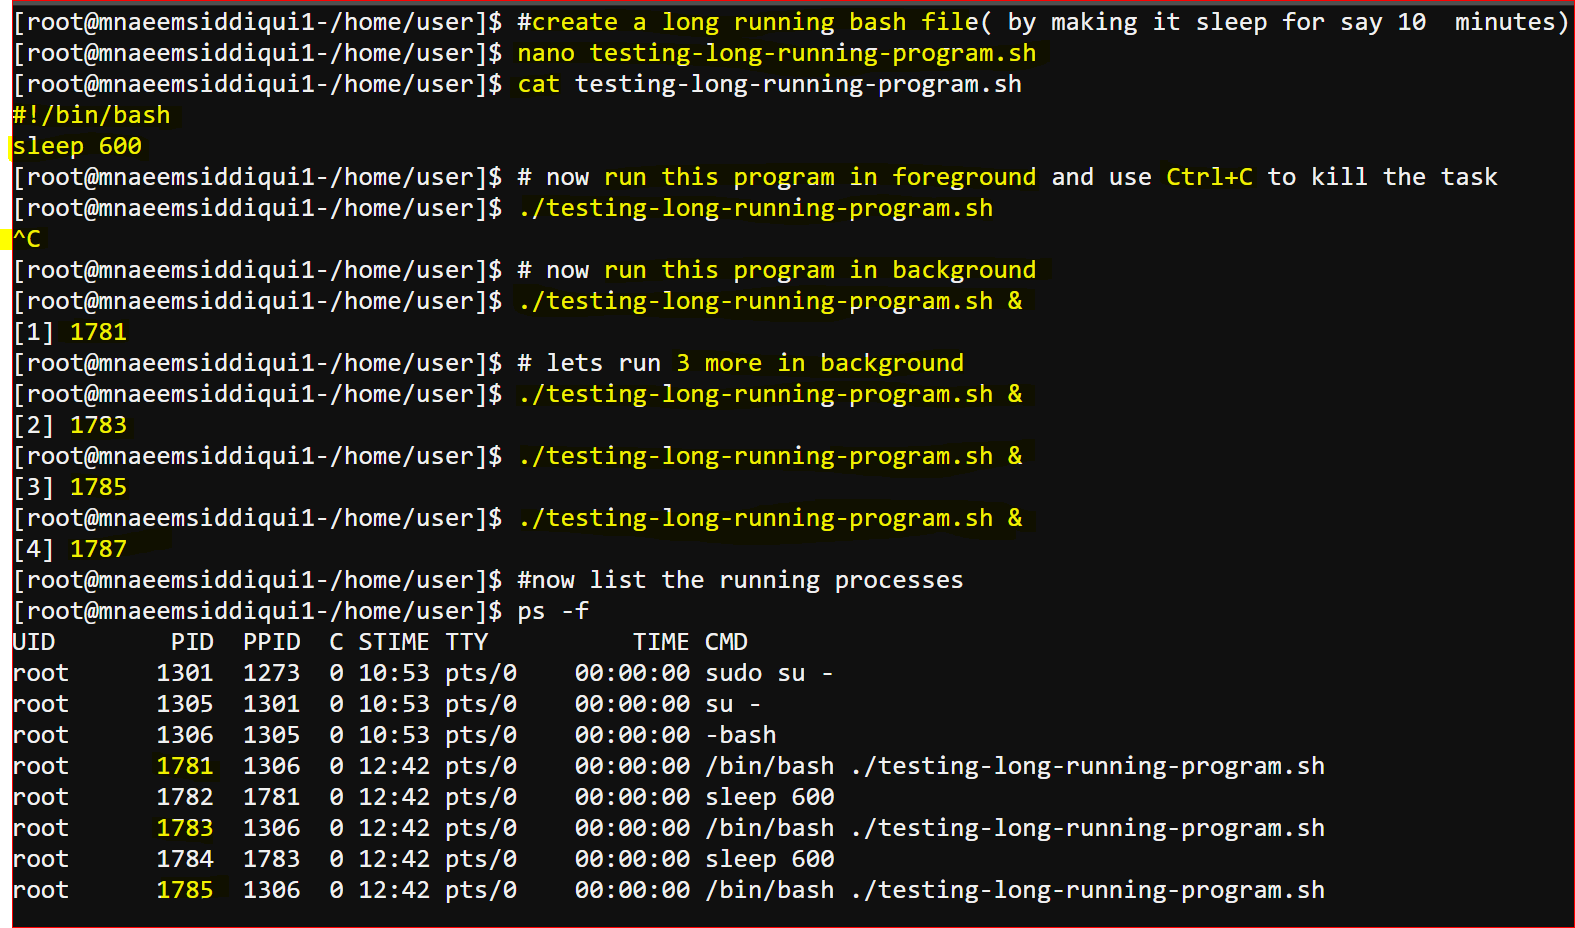
- Lets create a test long running program by creating a .sh file and typing
#!/bin/bash
sleep 600
-
- Now lets run it in foreground, since it will sleep for 10 mts, we have to close it by doing a Ctrl+C – ./testing-long-running-program.sh
- Now run the same program is background – ./testing-long-running-program.sh &
- Run few more programs in background – ./testing-long-running-program.sh &
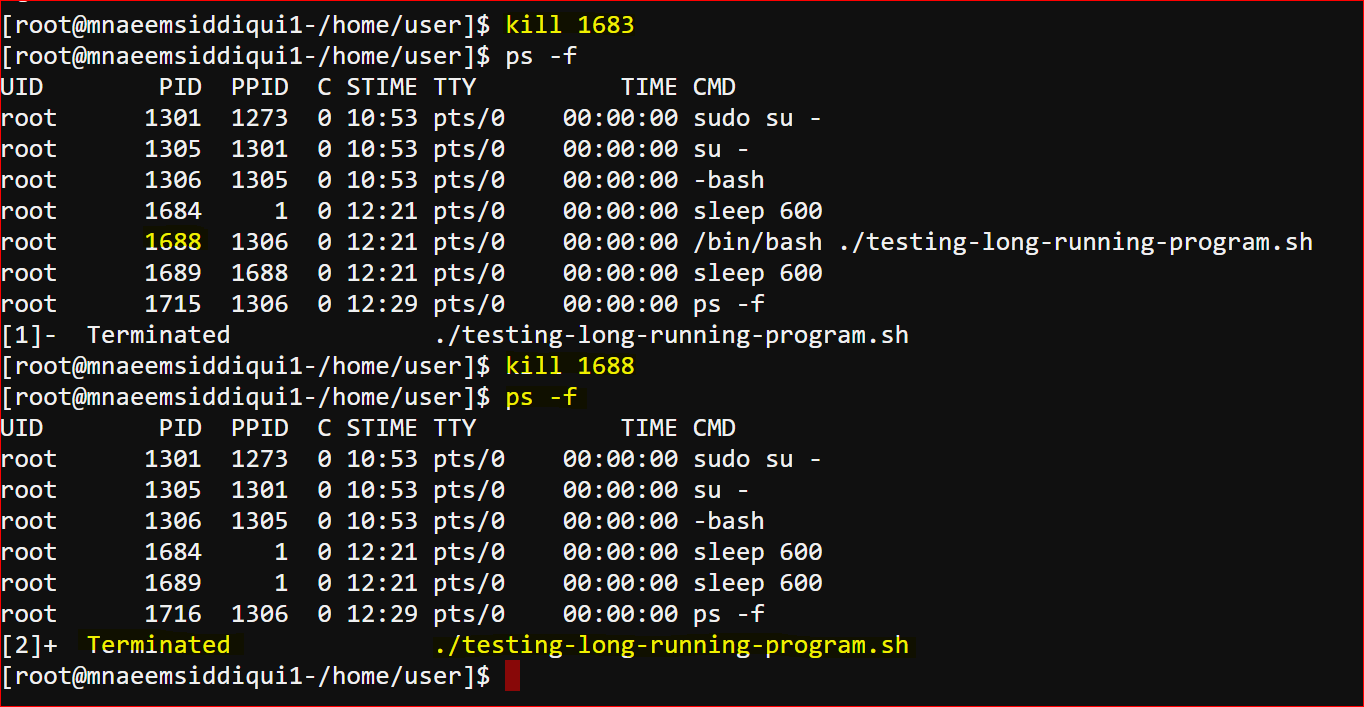
- now see a listing using ps -f
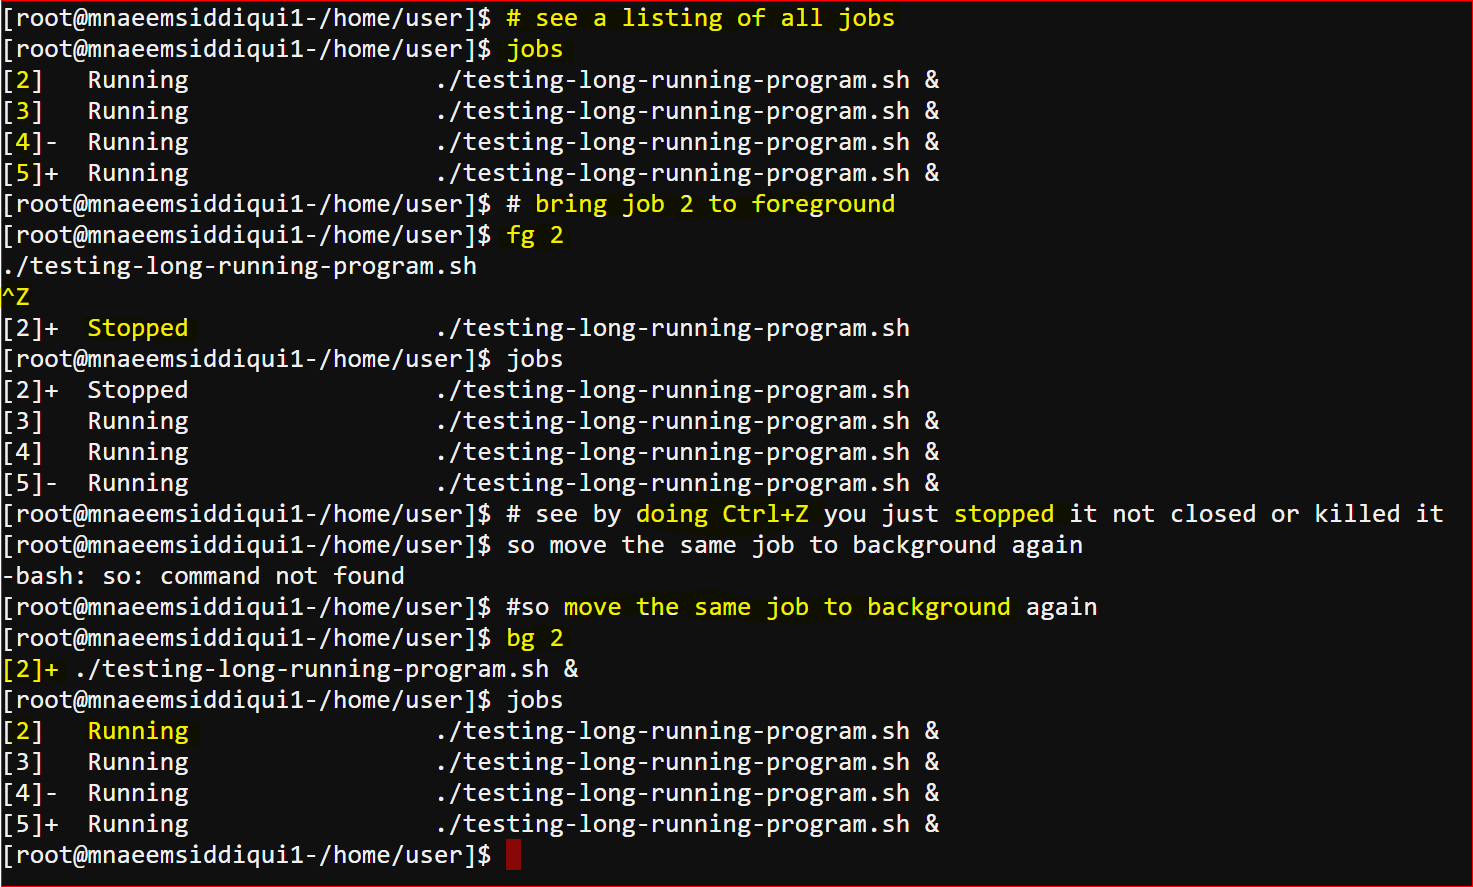
- To see all jobs – jobs
- Bring back current program from background to foreground – fg or fg jobnumber
- send current program from foreground to background – bg or bg jobnumber
- Kill a process – kill <pid> e.g. kill 1683
- Cron Service in Linux:
- Cron service is Linux is used to schedule or automate execution of jobs.
- The Cron service uses a Cron Tab ( Cron table ) which specifies when to run the job and what command to execute
- E.g. * * * * * command ( the 5 stars mean the following)
- 1st * – minutes ( 0-59) e.g. 0 or 0-5 etc
- 2nd * – hours( 0-23) e.g. 6 or 0-6 etc
- 3rd * – day of month ( 1-31) e.g. 5 or 1-3 etc
- 4th * – month of the year ( 1-12) e.g. 1 or 1-3 etc
- 5th * – day of week ( 0-6 where 0 is Sunday and 6 is Saturday) e.g. 0 or 0-3 etc
- command – its the command which needs to be executed
- E.g. 0 7 * * * opt/salesreport – will run sales report every at 7 am
- E.g. 0-3 * * * * opt/salesreport – will run sales report every at hour in minutes 0,1,2 and 3
- E.g. 30 6 * * * opt/salesreport – will run sales report every day at 6:30 am
- E.g. * * 1 * * opt/salesreport – will run sales report every months on 1st
- E.g. * * 1 1 * opt/salesreport – will run sales report every year on 1st day of Jan
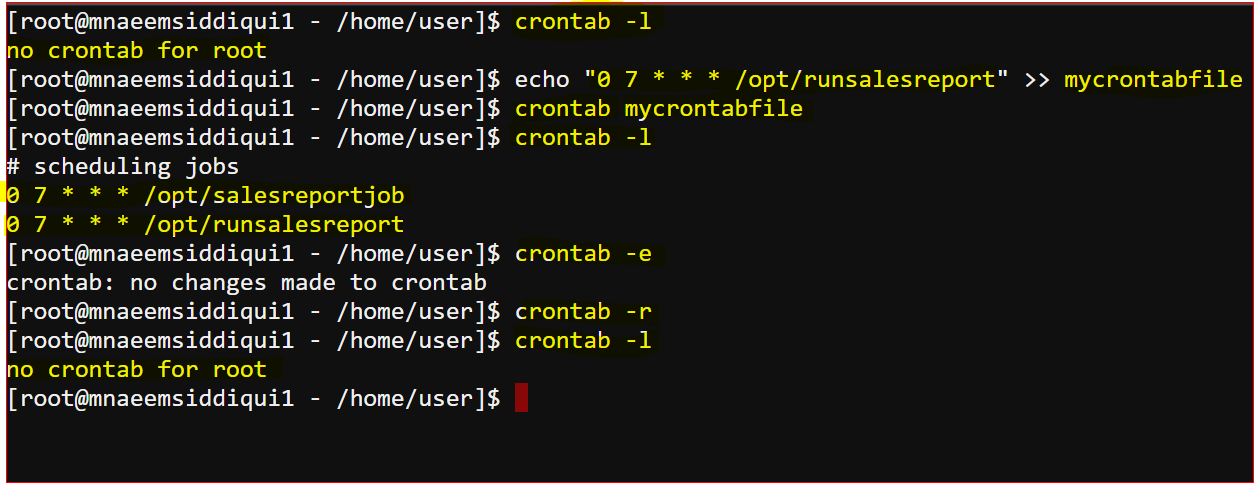
- To create a crontab file – crontab filename
- To list crontab jobs – crontab -l
- To remove crontab jobs – crontab -r
- To edit crontab jobs ( it uses default editor) – crontab -e
- Changing users in Linux:
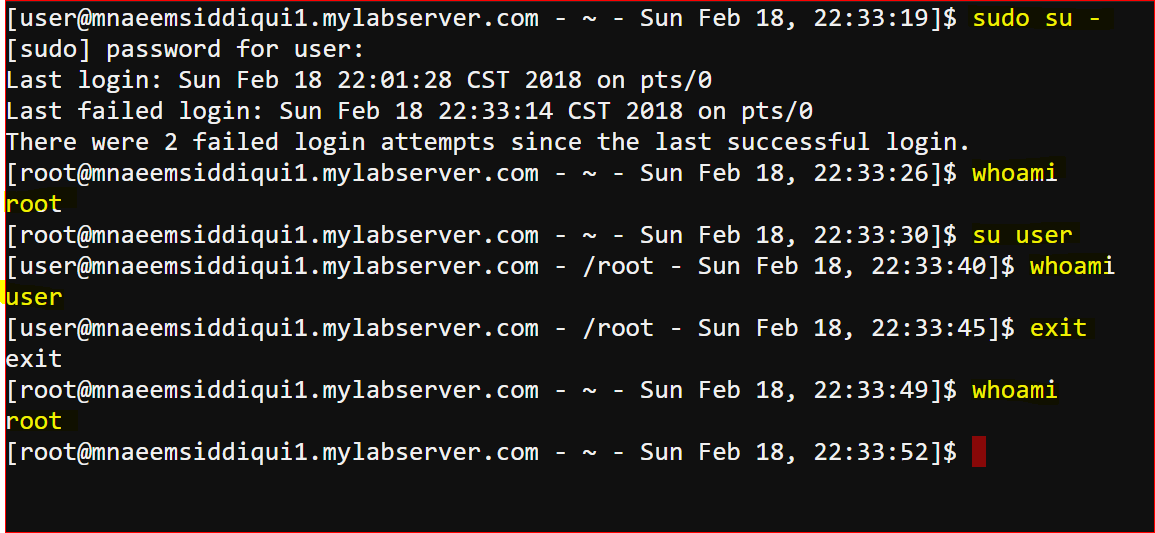
- whoami : show the current user
- su – or su : login as super user
- su username : logs as user name
- exit – to exit a user
- sudo – super do – means run as super user
- pwd – print working directory
- passwd – changes password
- run programs as other users:
- sudo -u oracleuser /etc/init.d/oracle start – starts oracle as oracleuser( its a name of a user you created)
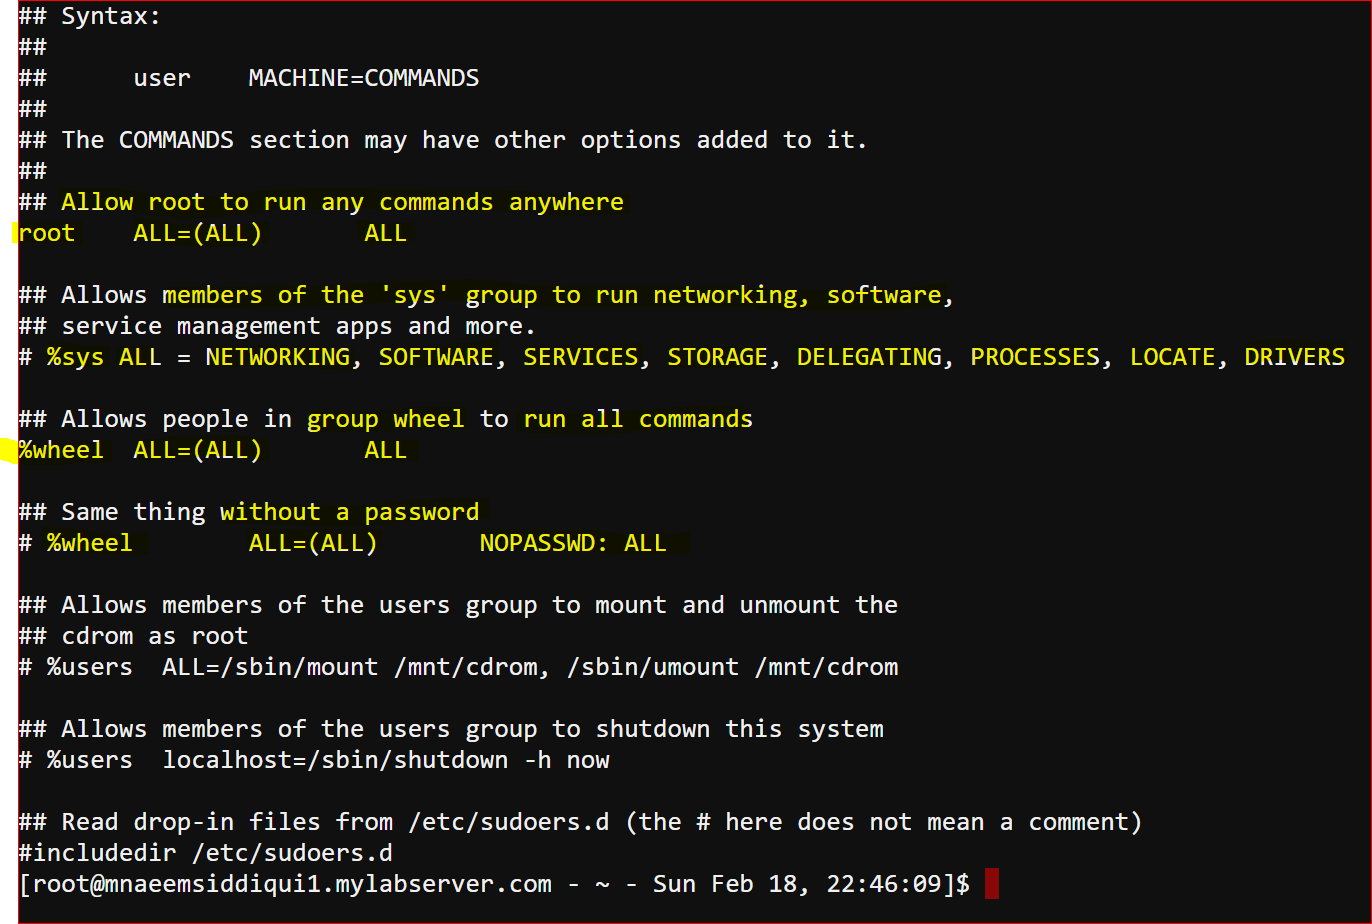
- list of sudoers –
- nano /etc/sudoers or vi /etc/sudoers or visudo (will use default editor)
- Shell History in Linux:
- The shell history or the history of the commands you executed is placed under history
- to see history of commands – history
- to increase history file size(# of commands) – export HISTSIZE=1000
- run previous command – !!
- autocomplete a command – Tab
- so search commands by string name – !PS1 ( will search in history any commands with PS1)
- The shell history or the history of the commands you executed is placed under history
- Installing and managing software on Linux systems:
- We use packages to install, remove or search for software on a linux system.
- Packages are collection of files which hold metadata(information about package itself), files and its dependencies needed to install a software.
- Package Managers are the tools which help in installing or removing software.
- There are different package managers for different distributions(distro)
- RPM based : Package manager : yum or rpm
- Distro – RedHat, CentOS, Fedora
- Commands for yum
- to install – yum install [-y] package-name
- to remove – yum remove package-name
- to search – yum search package-name
- Commands for rpm
- to install – rpm -ivh package-name.rpm
- to remove – rpm -e package-name
- to search – rpm -ql package-name
- Debian based: Package manager : apt-get or dpkg
- Distro – Ubuntu, Linux Mint, Debian
- Commands for apt
- to install – apt-get install [-y] package-name
- to remove – apt-get remove package-name
- to search – apt-cache search package-name
- Commands for dpkg
- to install – dpkg -i package-name.deb
- to remove – dpkg -e package-name
- to search – dpkg -l package-name
- RPM based : Package manager : yum or rpm
- Managing users and groups:
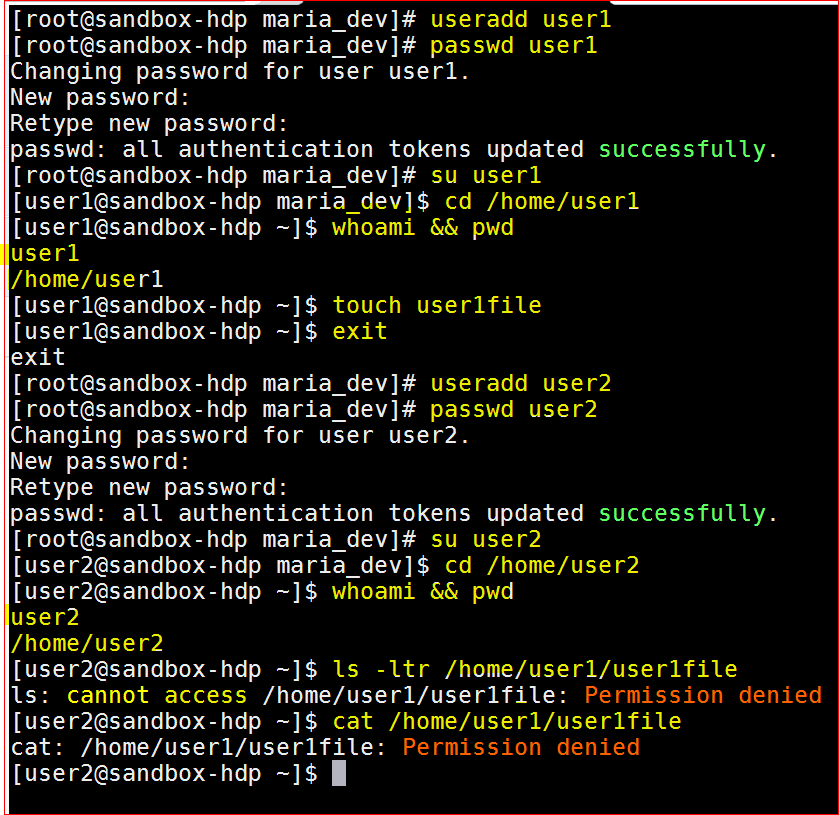
- lets create a user user1 and create a file by that user user1file.
- Now lets create another user user2 and lets try if user2 can access user1file.
- Create user user1 – useradd user1
- set password for user1 – passwd user1
- lets login for user1 : su user1
- lets the user 1 create a file – touch user1file
- Create user user2 – useradd user2
- set password for user2 – passwd user2
- lets login for user2 : su user2
- let user2 access user1file – cat user1file
- can user2 access user1 file – NO, why ?
- because user1 is the ‘owner’ of the file and user2 is the ‘other‘ for user1file
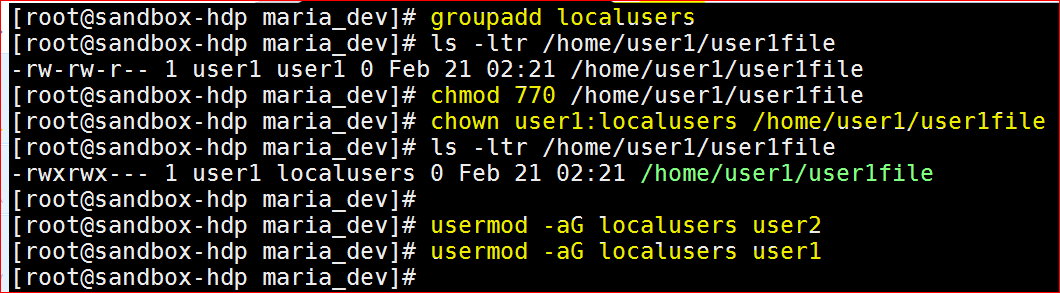
- How to resolve this issues
- Create a group and add both users to that group
- create a group – groupadd localusers
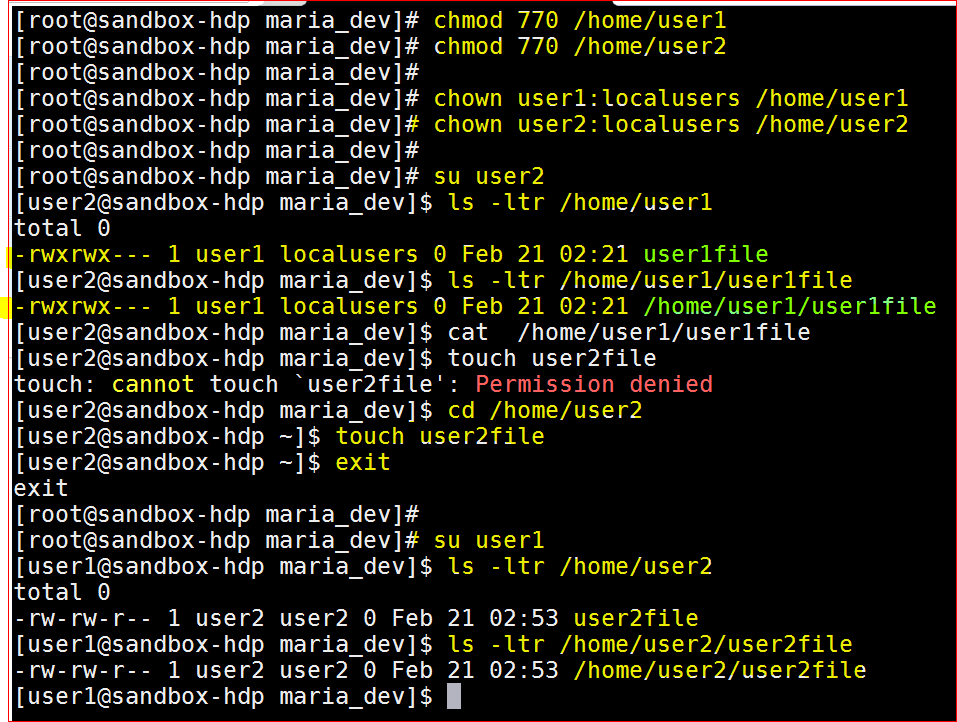
- change the group owner of the file – chown user1:localusers user1file and chown user1:localusers /home/user1
- change the mode of the file – chmod 440 user1file and chmod 440 /home/user1
- Now login as user2 and see the listing
- To view a list of groups – cat /etc/group
- To view a list of users- cat /etc/passwd
- To check if any other user than the root has a ‘0:0’ permission – cat /etc/passwd | grep 0:0
- if it returns only 1 row as – ‘root:x:0:0:root:/root:/bin/bash‘ , it means that the root security of yr system is not compromised
- check the ports on yr system – netstat -npl
- to check active services on the system – systemctl list-unit-files –type=service –state=enabled or service –status-all
- Create a group and add both users to that group
Note: This article is a refresher/tutorial where the effort was to catch up on basic Linux commands.